Build a Simple Camera App Using UIImagePickerController
Previously, we covered how to use the built-in APIs to read a RSS feed and build a simple RSS Reader app. In this tutorial, we are going to learn how to use the built-in camera of the iPhone (or the iPod or iPad, if they have one) to take a photo. Also, we’ll see how to access the internal photo library and allow user to pick a photo. The iOS library provides the class UIImagePickerController which is the user interface for managing the user interaction with the camera or with the photo library. As usual, the UIImagePickerController requires the use of a delegate to respond to interactions.
To help you understand the usage of UIImagePickerController, we’ll build a simple camera app. The example application is very simple: we will have a main window with a big UIImageView to show the selected photo, and two buttons: one to take a new photo, and the other one to select a photo from the photo library.
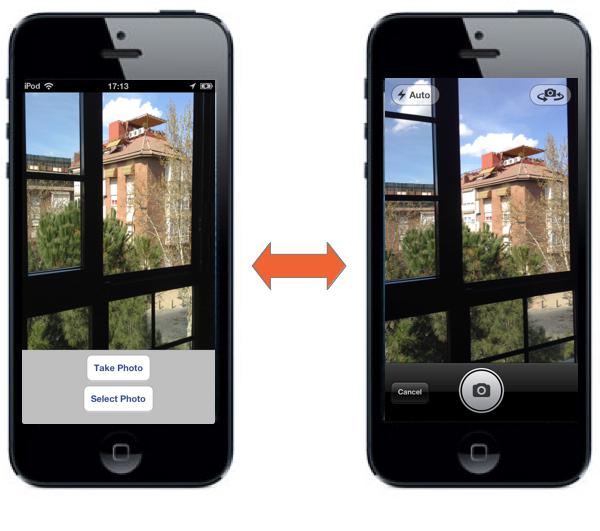
A simple camera app tutorial
Creating a Single View Application
Open Xcode and create a new Project, choose the template Single View Application as show below:
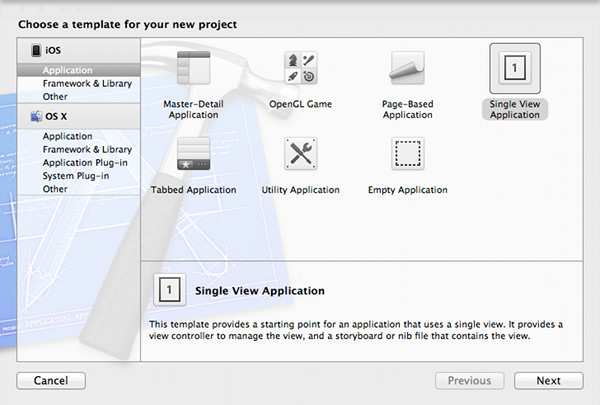
Single View Template
In the next screen enter CameraApp as the product name and set com.appcoda in the company identifier field. Select the “Use Authomatic Reference Counting” option, but unselect the “Use Storyboard” since we are not going to use storyboards for this project. Press next and crate.
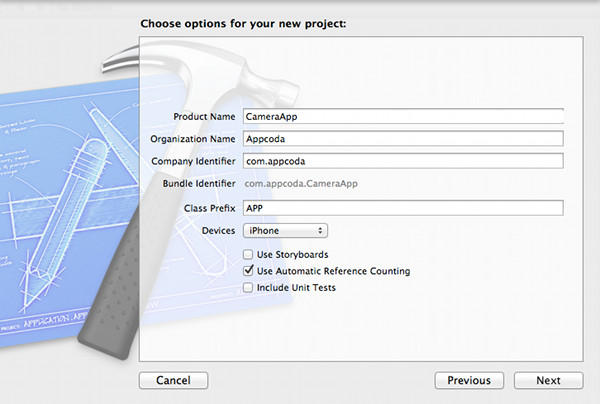
Project Properties
Designing the User Interface
Select the AppViewController.xib file from Xcode’s Navigator to display the View Controller on the Editor Pane. Select an UIImageView from the library and drag and drop on the top of the UIView. Resize the UIImageView to take the full screen width and more than half of the height. Next, drag and drop an UIButton below the UIImageView, centered, and change its title to “Take Photo”. Finally, drag and drop another UIButton below the previous one, again centered, and change its title to “Select Photo”. The resulting View Controller should look something like:
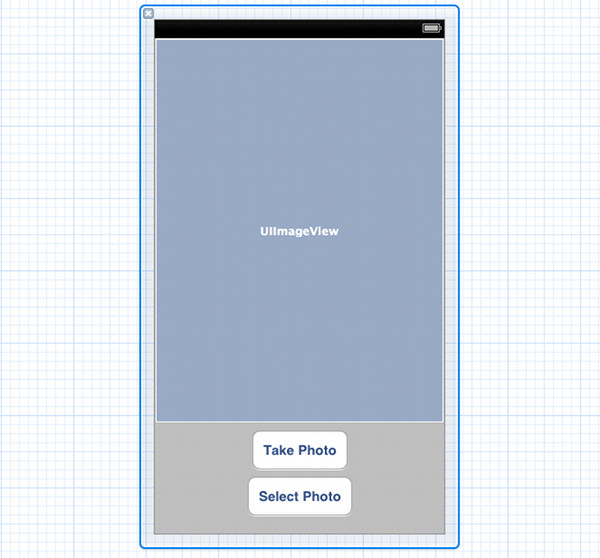
UIViewController Design
Select again the UIImageView. In the Inspector select the File tab, and unselect the Use AutoLayout option, because we do not want the UIImageView to be resized to the size of the image created with the camera, since that would leave almost no free space for the buttons.
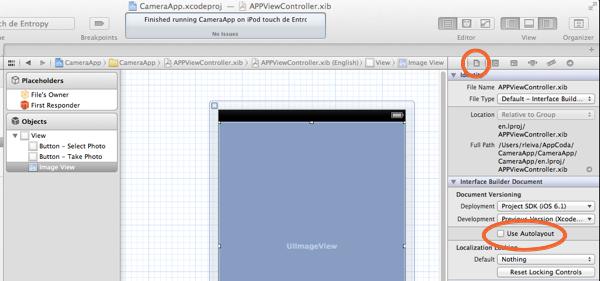
Disable Auto Layout
The next step is to create the connections. In order to do that, change the Editor to the Assistant mode meanwhile the AppViewController.xib file is selected. The AppViewController.h file should be opened. Control and drag from the UIImageView to the AppViewController.h and crate an IBOutlet.
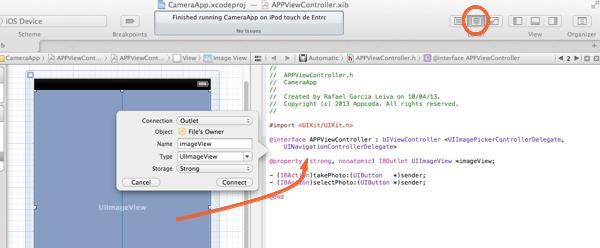
Application Outlets
In the connection field we have to choose Outlet, as Name use imageView, as Type select UIImageView, and finally, as Storage select Strong. That should create the following IBOutlet code:
|
1 |
@property (strong, nonatomic) IBOutlet UIImageView *imageView; |
In the same way, control and drag from the “Take Photo” button. In this case in the Connection field choose Action, as Name write takePhoto, the type is UIButton, the Event that fires the actions is “Touch Up Inside”, and the argument passed to the method is Sender. Do it again for the “Select Photo” button, but in this case name the action selectPhoto.
If you did everything correctly, the APPViewController.h should be something like:
|
1 2 3 4 5 6 7 8 9 10 |
#import @interface APPViewController : UIViewController @property (strong, nonatomic) IBOutlet UIImageView *imageView; - (IBAction)takePhoto: (UIButton *)sender; - (IBAction)selectPhoto:(UIButton *)sender; @end |
Implementing the View Controller
As we said before, we need a delegate to deal with the user interaction with the camera or the photo library. In order to do that we have to conform to the UIImagePickerControllerDelegate protocol. Also, since we are going to present the camera (or the photo library) modally, we have to implement the UINavigationControllerDelegate protocol as well. Add both protocols to the AppViewController.h file:
|
1 |
@interface APPViewController : UIViewController <UIImagePickerControllerDelegate, UINavigationControllerDelegate> |
When the user clicks (touch up inside) the “Take Photo” button, we have to create an UIImagePickerController and set its delegate to our AppViewController class. Also, we have to specify which kind of image picker we want to show, the camera with UIImagePickerControllerSourceTypeCamera, or a photo library with UIImagePickerControllerSourceTypePhotoLibrary; in this case we select the Camera. Once the picker has been crated, we have to present it modally with the method presentViewController.
Write the following takePhoto acton method:
|
1 2 3 4 5 6 7 8 9 10 |
- (IBAction)takePhoto:(UIButton *)sender { UIImagePickerController *picker = [[UIImagePickerController alloc] init]; picker.delegate = self; picker.allowsEditing = YES; picker.sourceType = UIImagePickerControllerSourceTypeCamera; [self presentViewController:picker animated:YES completion:NULL]; } |
Finally, we do the same for the selectPhoto action method, but changing the sourceType to UIImagePickerControllerSourceTypePhotoLibrary.
|
1 2 3 4 5 6 7 8 9 10 11 |
- (IBAction)selectPhoto:(UIButton *)sender { UIImagePickerController *picker = [[UIImagePickerController alloc] init]; picker.delegate = self; picker.allowsEditing = YES; picker.sourceType = UIImagePickerControllerSourceTypePhotoLibrary; [self presentViewController:picker animated:YES completion:NULL]; } |
Implementing the Delegate Methods of UIImagePickerController
When the user takes a photo with the camera and resizes the image (photo resizing is allowed since we said allowsEditing = YES when we created the image picker) the didFinishPickingMediaWithInfo method is called. As the first argument we have the picker who called the method, something very useful if we have more than one image picker in our application, but that is not our case, and so, we ignore this parameter. The second argument is more interesting. It is a NSDictionary which contains, among other things, the original image and the edited image (accessible through the tag UIImagePickerControllerEditedImage).
|
1 2 3 4 5 6 7 8 |
- (void)imagePickerController:(UIImagePickerController *)picker didFinishPickingMediaWithInfo:(NSDictionary *)info { UIImage *chosenImage = info[UIImagePickerControllerEditedImage]; self.imageView.image = chosenImage; [picker dismissViewControllerAnimated:YES completion:NULL]; } |
It might happen that the user cancel the operation by touching the “Cancel” button of the image picker view. In that case the picker will call the imagePickerControllerDidCancel method. The implementation of this method is very simple, since what we have to do is just remove (dismiss) the picker controller.
|
1 2 3 4 5 |
- (void)imagePickerControllerDidCancel:(UIImagePickerController *)picker { [picker dismissViewControllerAnimated:YES completion:NULL]; } |
Oops… the App Crashes
OK, our application is ready and it can be tested on a physical device. However, if we run the application on the simulator, it will crash. What has gone wrong? Well, the problem is that the simulator has no camera. If we want, we can control explicitly that case and show to the user an error message (that it is much better solution than a crash). And doing so it is a good idea, since it could happen that somebody will run our app in an old iPodTouch or iPad without a camera. The UIImagePickerController has a class method called isSourceTypeAvailable that allows us to check if the device has a built in camera (constant UIImagePickerControllerSourceTypeCamera).
For example, add the following code to the controller’s viewDidLoad method:
|
1 2 3 4 5 6 7 8 9 10 11 |
if (![UIImagePickerController isSourceTypeAvailable:UIImagePickerControllerSourceTypeCamera]) { UIAlertView *myAlertView = [[UIAlertView alloc] initWithTitle:@"Error" message:@"Device has no camera" delegate:nil cancelButtonTitle:@"OK" otherButtonTitles: nil]; [myAlertView show]; } |
Test the App Using a Physical Device
After changing the code, run the app again in iPhone Simulator. You should see the error message as the simulator doesn’t support camera. In order to test the app, you must load the app and test it on a physical iPhone (or other iOS devices). If everything is smooth, you should end up with a simple camera app that lets you take photo and access the internal photo library.

Download the Full Source Code
The UIImagePickerController class offers a great way to access iPhone’s camera and photo library. The sample camera app is not perfect but it gives you an idea how the UIImagePickerController works. The iOS SDK makes it so simple for developer to access the built-in camera and photo library.
For your complete reference, you can download the Xcode project for the sample app here.
As always, leave us comment and share your thought about the tutorial.

Comments
 Bhaskar Ghosh
AuthorThe problem is that the app crashes if I press the Take Photo button after I get the alert(that there is no camera on the device). How can I disable the Take Photo button if there is no camera on the device?
 David
David
AuthorBecause the webcam on your macbook is not attached to the iOS Simulator. You will have to place it on a iOS device that is dedicated to development, and to do that you must not only have an Apple developer account, but subscribe to Apple’s developer program.
 Joshua Dance
AuthorYou can disable the Take Photo button if the camera is not available by checking if the camera is usable with this function.
[UIImagePickerController isSourceTypeAvailable:UIImagePickerControllerSourceTypeCamera]
Just put the button in an if statement that hides it or disables it if that function returns false.
 npersson
AuthorGreat tutorial! But how can this site not have a search feature?
 Simon Ng
AuthorWe’re too busy to work on the tutorials 🙂 Anyway, we’ll build the search feature. At the mean time, you can find all the tutorials here: https://104.131.120.244/ios-programming-course/
 fitra wardhana
Authorhi..can u help me i have an error expected as u can see in the picture..
 Joshua Dance
AuthorYour error is above the AmbilGambar function. That line is fine. Having an error higher up in your code can cause problems lower down.
 itch
itch
AuthorI’m new to Xcode but I think… you have your AmbilGambar function in the APPViewController,h rather than in the APPViewController.m ??
Not wanting to tread on anyone’s toes.. (As I am very much a noob here..) but I had the same error. After cross referencing it with the downloadable source files… I saw that was my problem.
Hope that helps.
 chris
chris
Authorhi, great tutorial. can i make an button to email the taken or choosen picture? thanx for help!
 David
David
AuthorI would suggest this tutorial: https://mobile.tutsplus.com/tutorials/iphone/mfmailcomposeviewcontroller/
 zen
zen
AuthorHey! =)
First of all, thanks a lot for these (didactical great) tutorials. it helps me a lot to understand Xcode.
Unfortunately your Code (according to the tutorial AND using the downloaded project) doesn’t work on my iPad. It shows only a white screen, nothing more. (No warnings, nothing.) :/ I’ve also placed NSLogs in all methods: It calls viewDidLoad, but nothing more.
I use the latest version of Xcode and iOS.
I know that’s not much information, but do you have any clue why it is that way?
Grateful for any help,
zen
 zen
zen
Authorp.s.
Or any idea what to check next?
I’ve also checkt the downloaded source code and it only calls viewDidLoad and viewDidAppear
 Joshua Dance
AuthorHey Zen. The tutorial is for iPhone. You would need to use same idea but build it for iPad. For example a library picker has to be displayed in a popover control on the iPad. Your best bet would be to follow the tutorial step by step but doing everything for the iPad. When you hit problems, look up info on StackOverFlow.
 José M. Diaz-Mendez
AuthorI’m just beginning to learn some coding/programming. I saw this web page and thought I’d give it a shot for some practice. Do you know what I am doing wrong?
-Jose
 Adam C. Smith
AuthorLooks like you have your implementation and header files switched up
 James
James
AuthorHI,
I downloaded the xcode project from this site and deployed onto my iPhone 4S. When I click Take Photo -> OK, it crashes the app with no exceptions thrown. I even tried adding a Exception Breakpoint and still receive no log.
My device isn’t jailbroken and it’s running 6.1.3
What’s the cause?
Thanks!
 Nic
Nic
Authorwhy do we have to create an UIImagePickerController and set its delegate to our AppViewController class??
picker.delegate = self <– what does this do for us ?? It's a question puzzling me for a long time. Appreciate anyone help on this
 James Rustles
AuthorJust copy-pasted all of the code, and it doesn’t work properly. When I push this VC to the Navigation Controller, it crashes. I’m running it on a 4in device.
I did the next tutorial in this series – the video recording one – and it worked fine >.>
 Osvaldo Cipriano
AuthorHow do we make the photo we take to save in camera roll?
 Osvaldo Cipriano
AuthorAlready done it.
 Simon Ng
AuthorYou can use UIImageWriteToSavedPhotosAlbum function to save the image into camera roll. Check out the official reference here:
https://developer.apple.com/library/ios/#documentation/uikit/reference/UIKitFunctionReference/Reference/reference.html#//apple_ref/doc/uid/TP40006894-CH3-SW29
 Osvaldo Cipriano
AuthorWhen we save it how do we make that the photo is saved in a new folder that we assign?
 Guest
Guest
AuthorNow the camera is taking photo’s in a square format. How do I change that so he takings full screen photo’s? I tried “CGRectMake (0,0,320,460);” but that doesn’t work. Anyone?
 Lars Van Bourgognie
AuthorHello, I want my app to take full screen photo’s, now he’s taking square formatted photo’s.
I already tried CGRectMake but doesn’t work. Anyone?
 Shiya
Shiya
AuthorJust change your
 Shiya
Shiya
Authorin the IB button sender, change the following:
picker.allowsEditing = NO;
 Max Mitchell
Authorreplace picker.allowsEditing = YES; —to— picker.allowsEditing = NO; —and replace— UIImage *chosenImage = info[UIImagePickerControllerEditedImage]; —to— UIImage *chosenImage = info[UIImagePickerControllerOriginalImage];
 ravikumar
Authori need barcode reader example please send me
 hopipolla
AuthorExcellent tutorial. Very easy and well explained. Thanks!
 SENTHAMIL THENDRAL S
AuthorIn most of the programs i have executed in this tutorial i got the run time error in 14 main thread????actually why it is happened and where i had the mistake???
 Charles Jaimet
AuthorThat’s two great iOS tutorials I’ve read here in a row. Thanks Rafael. Strangely enough, I got the same problem as Senthamil when I went through the article but the problem disappeared when I downloaded the source code and cut and pasted from there.
 Simon Ng
AuthorCould you share with me the Xcode project that encountered the error? I’ll try to take a look.
 Just trying to help!
AuthorExcelent Tutorial, loved it… But dude, you said “crate” a thousand times, it’s “create”. Just a shout about it.
But still, great job! 😉
Helped me alot, thanks!
 tobeistobex
AuthorThe tutorial did not work for me, but the sample code did work. I noticed a bit of code in the AppDelegate. Could that be it?
 Yotam
Yotam
AuthorGood Job Man!!!
 Sankar Ram
AuthorThe tutorial did not work for me
please give me a solution for this!!!
– (void)imagePickerController:(UIImagePickerController *)picker didFinishPickingMediaWithInfo:(NSDictionary *)info {
UIImage *chosenImage = info[UIImagePickerControllerEditedImage]; // Array Subscript is not an integer
self.imageView.image = chosenImage;
[picker dismissViewControllerAnimated:YES completion:NULL];
}
 tooky
tooky
AuthorGreat Tutorial!! Really helped me, But in my app the image is being displayed in a second view. What do I need to add to the code to make that happen..? Thanks!
 Gary Stewart
Authorim pretty newish to this kind of coding but have learnt a fair bit and have unfortunately hit a bump in an app im working on.
I am trying to create a camera application that will allow the user to take a ‘before’ image, then take an ‘after’ image, I would then like the option for the images to be put together (left and right) and saved as one image.
So far I have managed to code the app to take a single picture with the code below:
HEADER:
#import
@interface ViewController : UIViewController
@property (strong, nonatomic) IBOutlet UIImageView *beforeImage;
– (IBAction)cameraBeforeImage:(UIButton *)sender;
– (IBAction)libraryBeforeImage:(UIButton *)sender;
– (IBAction)deleteBeforeImage:(UIButton *)sender;
@property (strong, nonatomic) IBOutlet UIImageView *afterImage;
– (IBAction)cameraAfterImage:(UIButton *)sender;
– (IBAction)libraryAfterImage:(UIButton *)sender;
– (IBAction)deleteAfterImage:(UIButton *)sender;
– (IBAction)saveImages:(UIButton *)sender;
————————————————————————————————————–
IMPLEMENTATION:
#import “ViewController.h”
@interface ViewController ()
@end
@implementation ViewController
– (void)viewDidLoad
{
[super viewDidLoad];
}
– (void)didReceiveMemoryWarning
{
[super didReceiveMemoryWarning];
// Dispose of any resources that can be recreated.
}
– (IBAction)cameraBeforeImage:(UIButton *)sender {
if (![UIImagePickerController isSourceTypeAvailable:UIImagePickerControllerSourceTypeCamera]) {
UIAlertView *myAlertView = [[UIAlertView alloc] initWithTitle:@”Oops!”
message:@”This Device Has No Camera, Please Select An Image From Your Library.”
delegate:nil
cancelButtonTitle:@”OK”
otherButtonTitles: nil];
[myAlertView show];
}else{
UIImagePickerController *picker = [[UIImagePickerController alloc] init];
picker.delegate = self;
picker.allowsEditing = YES;
picker.sourceType = UIImagePickerControllerSourceTypeCamera;
[self presentViewController:picker animated:YES completion:NULL];
}
}
– (IBAction)libraryBeforeImage:(UIButton *)sender {
UIImagePickerController *picker = [[UIImagePickerController alloc] init];
picker.delegate = self;
picker.allowsEditing = YES;
picker.sourceType = UIImagePickerControllerSourceTypePhotoLibrary;
[self presentViewController:picker animated:YES completion:NULL];
}
– (IBAction)deleteAfterImage:(UIButton *)sender {
}
– (IBAction)saveImages:(UIButton *)sender {
}
– (void)imagePickerController:(UIImagePickerController *)picker didFinishPickingMediaWithInfo:(NSDictionary *)info {
UIImage *chosenImage = info[UIImagePickerControllerEditedImage];
self.beforeImage.image = chosenImage;
[picker dismissViewControllerAnimated:YES completion:NULL];
}
– (void)imagePickerControllerDidCancel:(UIImagePickerController *)picker {
[picker dismissViewControllerAnimated:YES completion:NULL];
}
– (IBAction)deleteBeforeImage:(UIButton *)sender {
}
– (IBAction)cameraAfterImage:(UIButton *)sender {
}
– (IBAction)libraryAfterImage:(UIButton *)sender {
}
– (IBAction)saveImages:(UIButton *)sender {
}
————————————————————————————————-
Here is the list of things I need to add, any help on any of them would be very much appreciated!
Add the same functionality to the ‘After’ buttons as the ‘Before’ but to store the image in the ‘afterImage’ Image view.
Add functionality to the ‘saveImages’ button to save the two taken images as one image stitched together.
Thank you all in advance!
 Granit Gjevukaj
AuthorHi, I want to ask if it is possible to take multiple picture with the system camera at once and upload them later as an album for example via available API for social networks such as Facebook?
 linaji
AuthorI have a question how to save the image to the photo album?
 longi
longi
AuthorSimple good tutorial! Thumbs up!!!
 Milan Manwar
AuthorThank you..!!
 Mihai Popa
AuthorHi there! Thanks for the great tutorial 🙂
I used the code from this tutorial in the application the I am working at. But there seams to be a leak in the code. So I downloaded the sample project and opened it in Xcode but the same thing happens the sample project as well.
Click Take Photo, then take the photo, then click Use photo, then leak… Could this be a problem with the UIImagePickerController component?
Thanks!
Mihai
 Tim Erickson
AuthorSuper! A question: early on, why use strong storage for the outlet for the view? Isn’t it stored strong in the nib?
 Tomas
Tomas
AuthorHi,
Is it possible to add another image on top of the Camera?
So when you click “take a picture”, it take you to the camera, and the camera shows another picture (let’s say the Moon) on the camera, and when you take the picture it is also saved with the “moon”
 mike
mike
AuthorHi mine is not saving the photos it takes?
 John
John
Authorthis is crap! Why take the time to write a tutorial and post code that doesn’t come close to doing what it is suppose to do? This example simply lets you take a photo..Period!
 Naeem
Naeem
AuthorWrite the “takePhoto” Method like this..
– (IBAction)takePhoto:(UIButton *)sender {
if ([UIImagePickerController isSourceTypeAvailable:UIImagePickerControllerSourceTypeCamera]) {
UIImagePickerController *picker = [[UIImagePickerController alloc]init];
picker.delegate = self;
picker.allowsEditing = YES;
picker.sourceType = UIImagePickerControllerSourceTypeCamera;
[self presentViewController:picker animated:YES completion:NULL];
} else
{
UIAlertView *myAlertView = [[UIAlertView alloc] initWithTitle:@”Error”
message:@”Device has no camera”
delegate:nil
cancelButtonTitle:@”OK”
otherButtonTitles:nil];
[myAlertView show];
}
}
 souvickcse
AuthorHi with controller.allowsEditing=YES; I am not able to select the bottom of the image, is there any way to so this?
 Montana Burr
AuthorIf the camera’s a big part of the app, just add “camera” to your capabilities file.
 enrique
AuthorHow?
 Kamran Usmani
AuthorHello, I want to set the reference of the image. Because when I am redirecting any of VC and coming back to this imageVC image is vanished from image view.
 Gregory Molette
AuthorHello everyone !
if i want to store the image taken in a tableview in the same application.
How can i do it ?
Thanks
 Anurag Rattan
AuthorCan you post it using Swift as well??
 Anusha M
AuthorHai, i used same code in my app but i am getting null when i print an image.but i download this code and when i ran it is printing the size of an image. can anybody help me why i am getting null
 Anusha M
AuthorHi, i used same code in my app but i am getting null when i print an image.but i download this code and when i ran it is printing the size of an image. can anybody help me why i am getting null
 pofrani .
AuthorHi – thank you for this. Is it possible to take a photo using a resized window version? So instead of the viewfinder being the full screen, I would like to resize the view finder to something smaller?
 Thomas Hogarth
AuthorThanks for this, great reference for the image picker, had mine running in minutes.
 saran
saran
Author/Coredata with JSON
// ViewController.m
// Core Data
//
// Created by developer on 29/09/15.
// Copyright (c) 2015 developer. All rights reserved.
//
#import “ViewController.h”
#import “AppDelegate.h”
#import “next.h”
@interface ViewController ()
{
IBOutlet UITextField *name;
IBOutlet UITextField *country;
NSString *rooturl;
NSMutableArray *ary;
NSMutableDictionary *array;
}
@end
@implementation ViewController
-(NSManagedObjectContext*)managedObjectContext
{
NSManagedObjectContext*context=nil;
id delegate=[[UIApplication sharedApplication]delegate];
if ([delegate performSelector:@selector(managedObjectContext)]) {
context=[delegate managedObjectContext];
}return context;
}
#pragma mark -Webservice
-(void)viewWillAppear:(BOOL)animated
{
[super viewWillAppear:YES];
rooturl=[NSString stringWithFormat:@”https://www.elitedoctorsonline.com/api_mob/browser/search/search.aspx?cou_id=211&lang=en”];
[self Getmethod];
}
-(void)Getmethod
{
NSURL *url=[[NSURL alloc]initWithString:rooturl];
NSMutableURLRequest *request=[[NSMutableURLRequest alloc]initWithURL:url];
[email protected]”GET”;
NSOperationQueue *queue=[[NSOperationQueue alloc]init];
[NSURLConnection sendAsynchronousRequest:request queue:queue completionHandler:^(NSURLResponse *response, NSData *data, NSError *connectionError) {
if (!connectionError)
{
NSHTTPURLResponse *response1=(NSHTTPURLResponse *)response;
if (response1.statusCode==200) {
NSDictionary *dict=[NSJSONSerialization JSONObjectWithData:data options:NSJSONReadingAllowFragments error:&connectionError];
ary=[[NSMutableArray alloc]initWithArray:[dict objectForKey:@”doctor_data”]];
for (NSDictionary *asset in ary) {
NSLog(@”full name :%@”, [asset valueForKey:@”fullname”]);
NSString *fullName = [asset valueForKey:@”fullname”];
NSString *country1 =[asset valueForKey:@”cou_name”];
NSManagedObjectContext *context=[self managedObjectContext];
NSEntityDescription *names=[NSEntityDescription insertNewObjectForEntityForName:@”Doctor” inManagedObjectContext:context];
[names setValue:fullName forKey:@”fullname”] ;
[names setValue:country1 forKey:@”country”];
// [names setValue:country.text forKey:@”country”];
NSLog(@”Save value is:%@”,names);
NSError *error;
if ([context save:&error]) {
// name.text=nil;
// country.text=nil;
NSLog(@”Saved Successfully”);
}else
{
NSLog(@”%@”,error.localizedDescription);
}
}
//ary=[[NSMutableArray alloc]initWithArray:array];
array=[ary valueForKey:@”fullname”];
// NSLog(@”Full name is:%@”,array);
}
}
}];
}
-(IBAction)save:(id)sender
{
[self Getmethod];
}
-(IBAction)view:(id)sender
{
next *n=[self.storyboard instantiateViewControllerWithIdentifier:@”next”];
// n.array1=[NSMutableArray arrayWithArray:array];
[self.navigationController pushViewController:n animated:YES];
}
– (void)viewDidLoad {
[super viewDidLoad];
// Do any additional setup after loading the view, typically from a nib.
}
– (void)didReceiveMemoryWarning {
[super didReceiveMemoryWarning];
// Dispose of any resources that can be recreated.
}
@end
#import
@interface next : UIViewController
@property(nonatomic,strong)NSMutableArray *array1;
@property(nonatomic,strong)NSDictionary *dict1;
SENTHAMIL THENDRAL S
//
// next.m
// Core Data
//
// Created by developer on 29/09/15.
// Copyright (c) 2015 developer. All rights reserved.
//
#import “next.h”
#import “AppDelegate.h”
@interface next ()
{
IBOutlet UITableView *table;
}
@end
@implementation next
-(NSManagedObjectContext*)managedObjectContext
{
NSManagedObjectContext*context=nil;
id delegate=[[UIApplication sharedApplication]delegate];
if ([delegate performSelector:@selector(managedObjectContext)]) {
context=[delegate managedObjectContext];
}return context;
}
– (void)viewDidLoad {
[super viewDidLoad];
NSManagedObjectContext *context=[self managedObjectContext];
NSFetchRequest *request=[NSFetchRequest fetchRequestWithEntityName:@”Doctor”];
_array1=[[context executeFetchRequest:request error:nil]mutableCopy];
// Do any additional setup after loading the view.
NSLog(@”values is :%@”,self.array1);
[table reloadData];
}
– (void)didReceiveMemoryWarning {
[super didReceiveMemoryWarning];
// Dispose of any resources that can be recreated.
}
-(NSInteger)numberOfSectionsInTableView:(UITableView *)tableView
{
return 1;
}
-(NSInteger)tableView:(UITableView *)tableView numberOfRowsInSection:(NSInteger)section
{
return _array1.count;
}
-(UITableViewCell *)tableView:(UITableView *)tableView cellForRowAtIndexPath:(NSIndexPath *)indexPath
{
static NSString *[email protected]”Cell”;
UITableViewCell *cell=[tableView dequeueReusableCellWithIdentifier:cellname];
if (cell==nil) {
cell=[[UITableViewCell alloc]initWithStyle:UITableViewCellStyleSubtitle reuseIdentifier:cellname] ;
}
NSManagedObject *display=[_array1 objectAtIndex:indexPath.row];
cell.textLabel.text=[display valueForKey:@”fullname”];
cell.detailTextLabel.text=[display valueForKey:@”country”];
return cell;
}
/*
#pragma mark – Navigation
// In a storyboard-based application, you will often want to do a little preparation before navigation
– (void)prepareForSegue:(UIStoryboardSegue *)segue sender:(id)sender {
// Get the new view controller using [segue destinationViewController].
// Pass the selected object to the new view controller.
}
*/
@end
 saran
saran
Author-(IBAction)save:(id)sender
{
NSManagedObjectContext *context=[self managedObjectContext];
NSManagedObject *newvalue=[NSEntityDescription insertNewObjectForEntityForName:@”Doctor” inManagedObjectContext:context];
[newvalue setValue:name.text forKey:@”fullname”];
[newvalue setValue:country.text forKey:@”country”];
//[newvalue setValue:self.companytxt.text forKey:@”company”];
NSLog(@”save”);
NSError *error=nil;
if (![context save:&error]) {
NSLog(@”Can’t Save! %@ %@”, error, [error localizedDescription]);
}
[self Getmethod];
next *n=[self.storyboard instantiateViewControllerWithIdentifier:@”next”];
// n.array1=[NSMutableArray arrayWithArray:array];
[self.navigationController pushViewController:n animated:YES];
}
 Avinash Dadhich
AuthorAfter i take that photo I want to allow the user to be able to rotate it or resize it before clicking on use photo how can I do that?
 Pablo Ezequiel
AuthorGreat tutorial to understand basic Camera concepts on iOS! Thanks! I works ok for me
 Hamza Ahmed
AuthorHi great work, excellent tutorial. Can you help me with this problem? My problem is that I already have an Image selected but i want to edit it. If you see the contacts app of ios when you save a contact with an image and then if you want to edit the already selected image it directly show the Move and Scale Screen. How can I achieve this. That is show the Move and Scale screen directly without opening the camera or the photo library.
 Dharmendra Viradiya
AuthorHello friend,
I find out, why application crashed, because if you want to access a user’s private data you need to first ask the user for permission.You do this by adding a usage key to your app’s Info.plist together with a purpose string.
Please refer this link..https://useyourloaf.com/blog/privacy-settings-in-ios-10/
I hope it will be help you.
 Chris
Chris
AuthorIf there is no memory left in the device, will Apple’s API allow the camera to even open?
 Vijay Kumar
AuthorHello, this tutorial is good. but we should know we have to add a key in plist.
NSPhotoLibraryUsageDescription
$(YOUR_APP_NAME) uses photos
 Jack
Jack
AuthorI’ve got a million dollar idea. I need a developer. No bullshiting. It is the next big thing. I need developers to work with.
 Raviteja Mathangi
Authorhow can we keep that image in Core Data give me suggestion plz
 Hassan
AuthorFantastic guide, helped a lot, Thank you so much.
Appreciate if you could add some updates regarding iOS 11 SDK, the app may crash if we do not add it.
Kindly add the following to info.plist:
NSCameraUsageDescription
Take a photo