A Beginner's Guide to Swift 2
Swift 2 was announced at WWDC 2015. Let's take a quick look at the update and see what's new.
Swift 2 was announced at WWDC 2015. Let's take a quick look at the update and see what's new.
Last year, Apple brought us Swift, a brand new programming language for both iOS and OS X. When it was first announced, just like other iOS developers, I was thrilled. Advertised as a fast and safe language, Swift has now grown to one of the most popular programming languages. As expected, the company introduced Swift 2 at WWDC this year. In this article, I would like to give a quick update of Swift 2, showing you some of the new features.
We're stepping on the gas this year with Swift 2. We think Swift is the next big programming language, the one we will all do application and systems programming on for 20 years to come. We think it should be everywhere and used by everyone.
- Craig Federighi, Apple’s senior vice president of Software Engineering
One big news about Swift 2 is that it'll go open source in late 2015. If you missed the WWDC keynote or have been living under a rock lately, you read it right: Swift goes open source. This is a huge deal. Later this year, Apple will release Swift’s source code to the public, including the compiler and standard libraries, under an OSI-compliant license. Apple will also port the source code to Linux. Developers will be able to contribute to the development of the language and write programs on Linux using Swift. In fact, you’re encouraged to contribute to the development of the language. Probably some days in the future, you'll be able to use Swift to develop Android apps.
Along with this exciting news, Swift 2 includes some new features such as improved error handling, protocol extensions and availability check.
In this article, I will give you a brief overview of the updates.
Let’s first start with something basics. The classic do-while loop is now renamed to repeat-while. Here is an example:
var i = 0
repeat {
i++
print(i)
} while i < 10
As you will see in later section, the do keyword can now apply to other language features. By changing do to repeat, you can easily recognise the code block as a loop.
Another fundamental feature is the introduction of where clause for the for-in statement. You can now define a condition in a for using the where clause. When you loop through an array, for example, only those items that meet the criteria will be processed.
let numbers = [20, 18, 39, 49, 68, 230, 499, 238, 239, 723, 332]
for number in numbers where number > 100 {
print(number)
}
In the above example, it only prints out those numbers that are greater than 100.
When Swift was first released, switch statements have had quite an update. Not only can you use switch to match any data types, switch supports both range and pattern matchings. Here is an example of range matching:
let examResult = 49
switch examResult {
case 0...49: print("Fail!")
case 50...100: print("Pass!")
default: break
}
In Swift 2, on top of `switch`, you can use `if case` to perform range matching:
if case 0...49 = examResult {
print("Fail!")
} else if case 50...100 = examResult {
print("Pass!")
}
if case can also apply to pattern matching. Here I use tuples as an example:
let userInfo = (id: "petersmith", name: "Peter Smith", age: 18, email: "simon")
if case (_, _, 0..<18, _) = userInfo {
print("You're not allowed to register an account because you're below 18.")
} else if case (_, _, _, let email) = userInfo where email == "" {
print("Your email is blank. Please fill in your email address.")
} else {
print("You are good to go!")
}
The first if case clause tests if the user’s age is over 18. The underscore means "I don’t care about this value." Here we just focus on verifying the user's age. The else if case is used to test if the email is empty. Like switch cases, you can create a temporary binding for a value when using if case. We bind the value to an email constant and perform the matching through the where clause.
Swift 2 introduces the guard keyword. According to Apple’s documentation, guard is described like this:
A guard statement, like an if statement, executes statements depending on the Boolean value of an expression. You use a guard statement to require that a condition must be true in order for the code after the guard statement to be executed.
Before I further explain the guard statement, let’s go straight to the following example:
struct Article {
var title:String?
var description:String?
var author:String?
var totalWords:Int?
}
func printInfo(article: Article) {
if let totalWords = article.totalWords where totalWords > 1000 {
if let title = article.title {
print("Title: (title)")
} else {
print("Error: Couldn't print the title of the article!")
}
} else {
print("Error: Couldn't print the total word count!")
}
}
let sampleArticle = Article(title: "Swift Guide", description: "A beginner's guide to Swift 2", author: "Simon Ng", totalWords: 1500)
printlnfo(sampleArticle)
Here we create a printInfo function to display the title of an article. However, we will only print the information for an article with more than a thousand words. As the variables are optionals, we use if let to verify if the optional contains a value or not. If the optional is nil, we display an error message. If you execute the code in Playgrounds, it should display the title of the article.
In general, the if-else statements follow this pattern:
if some conditions are met {
// do something
if some conditions are met {
// do something
} else {
// show errors or performs other operations
}
} else {
// show errors or performs other operations
}
As you may notice, if you have to test more conditions, it will be nested with more conditions. There is nothing wrong with that programmatically. But in terms of readability, your code will get messy if there are a lot of nested conditions.
This is where the guard statement comes in. The syntax of guard looks like this:
guard
// what to do if the condition is not met
}
// continue to perform normal actions
If the condition, defined in the guard statement is not met, the code inside the else branch is executed. On the other hand, if the condition is met, it skips the else clause and continues the code execution.
If you rewrite the sample code using guard, it is a lot cleaner:
func printInfo(article: Article) {
guard let totalWords = article.totalWords where totalWords > 1000 else {
print("Error: Couldn't print the total word count!")
return
}
guard let title = article.title else {
print("Error: Couldn't print the title of the article!")
return
}
print("Title: (title)")
}
With guard, you focus on handling the condition you don't want. Furthermore, it forces you to handle one case at a time, avoiding nested conditions. Thus, the code is cleaner and easier to read.
When developing an app or any programs, you'll need to handle every possible scenarios, whether it's good or bad. Obviously, things may go wrong. Say, if you're developing an app that connects to a cloud server, your app has to deal with situations where the Internet connection is unavailable or the cloud server is failed to connect.
In the current version of Swift, it lacks a proper error handling model. As an example, you handle error conditions like this:
let request = NSURLRequest(URL: NSURL(string: "https://www.apple.com")!)
var response:NSURLResponse?
var error:NSError?
let data = NSURLConnection.sendSynchronousRequest(request, returningResponse: &response, error: &error)
if error == nil {
print(response)
// Parse the data
} else {
// Handle error
}
When calling a method that may cause a failure, you normally pass it with an NSError object (as a pointer). If there is an error, the object will be set with the corresponding error. You then check if the error object is nil or not and respond to the error accordingly.
That's how you handle errors in Swift 1.2.
Note: NSURLConnection.sendSynchronousRequest() has been deprecated in iOS 9. As most readers are familiar with the usage, it is used in the example.
try / throw / catch
In Swift 2, it comes with an exception-like model using try-throw-catch keywords. The same code snippet will become this:
let request = NSURLRequest(URL: NSURL(string: "https://www.apple.com")!)
var response:NSURLResponse?
do {
let data = try NSURLConnection.sendSynchronousRequest(request, returningResponse: &response)
print(response)
// Parse the data
} catch {
// handle error
print(error)
}
Now you use do-catch statement to catch errors and handle them accordingly. As you may notice, we’ve put a try keyword in front of the method call. With the introduction of the new error handling model in Swift 2.0, some methods can throw errors to indicate failures. When we invoke a throwing method, you will need to put a try keyword in front of it.
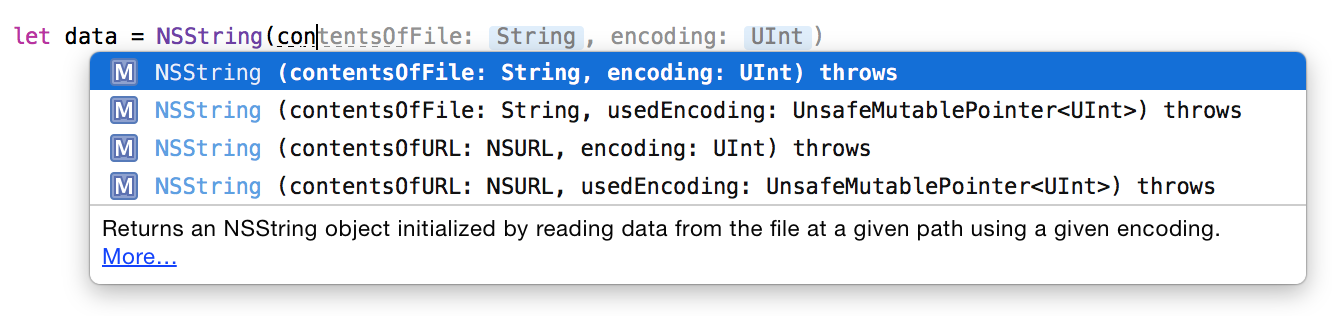
How do you know if a method throws an error? As you type the method in the built-in editor, the throwing methods are indicated with the throws keyword.
Now that you should understand how to call a throwing method and catch the errors, how do you indicate a method or function that can throw an error?
Imagine you’re modelling a lite shopping cart. Customers can use the cart to temporarily store and checkout their items, but this cart will throw an error for the following conditions:
- The shopping cart can only store a maximum of 5 items. Otherwise, it throws a cartIsFull error.
- There must be at least one item in the shopping cart during checkout. Otherwise, it throws a cartIsEmpty error.
In Swift, errors are represented by values of types conforming to the ErrorType protocol. Usually you use an enumeration to model the error conditions. In this case, you can create an enumeration that adopts ErrorType like this for the shopping cart errors:
enum ShoppingCartError: ErrorType {
case cartIsFull
case emptyCart
}
For the shopping cart, we create a LiteShoppingCart class to model its functions. Here is a sample code snippet:
struct Item {
var price:Double
var name:String
}
class LiteShoppingCart {
var items:[Item] = []
func addItem(item:Item) throws {
guard items.count < 5 else {
throw ShoppingCartError.cartIsFull
}
items.append(item)
}
func checkout() throws {
guard items.count > 0 else {
throw ShoppingCartError.emptyCart
}
// Continue with the checkout
}
}
If you take a closer look at the addItem method, you may notice the throws keyword. We append the throws keyword in the method declaration to indicate that the method can throw an error. In the implementation, we use guard to ensure the total number of items is less than 5. Otherwise, we throw the ShoppingCartError.cartIsFull error.
To throw an error, you just write the throw keyword, followed by the actual error. For the checkout method, we have a similar implementation. If the cart does not contain any items, we throw the ShoppingCartError.emptyCart error.
Now, let’s see what happens when performing a checkout on an empty cart. I recommend you to fire up Xcode and use Playgrounds to test out the code.
let shoppingCart = LiteShoppingCart()
do {
try shoppingCart.checkout()
print("Successfully checked out the items!")
} catch ShoppingCartError.cartIsFull {
print("Couldn't add new items because the cart is full")
} catch ShoppingCartError.emptyCart {
print("The shopping cart is empty!")
} catch {
print(error)
}
Here we try to add a total of 6 items to the shoppingCart object. Again, it will throw an error because the shopping cart cannot hold more than 5 items.
When catching errors, you can indicate the exact error (e.g. ShoppingCartError.cartIsFull) to match, so you can provide very specific error handling. Alternatively, if you do not specify a pattern in the catch clause, Swift will match any error and automatically bind the error to the error constant. As a best practice, you should try to catch the specific errors that are thrown by the throwing method. At the same time, you should write a catch clause that matches any errors. This ensures all possible errors are handled.
try shoppingCart.addItem(Item(price: 100.0, name: "Product #1"))
try shoppingCart.addItem(Item(price: 100.0, name: "Product #2"))
try shoppingCart.addItem(Item(price: 100.0, name: "Product #3"))
try shoppingCart.addItem(Item(price: 100.0, name: "Product #4"))
try shoppingCart.addItem(Item(price: 100.0, name: "Product #5"))
try shoppingCart.addItem(Item(price: 100.0, name: "Product #6"))
Here we try to add a total of 6 items to the shoppingCart object. Again, it will throw an error because the shopping cart cannot hold more than 5 items.
When catching errors, you can indicate the exact error (e.g. ShoppingCartError.cartIsFull) to match, so you can provide very specific error handling. Alternatively, if you do not specify a pattern in the catch clause, Swift will match any error and automatically bind the error to the error constant. As a best practice, you should try to catch the specific errors that are thrown by the throwing method. At the same time, you should write a catch clause that matches any errors. This ensures all possible errors are handled.
defer
If you have programmed in Java, it offers a similar exception handling model known as try-catch-finally. The code specified in the finally clause will be run regardless of errors.
Swift 2 provides a similar feature by introducing the defer keyword. The code defined in the defer block will be executed just right before the completion of the current scope, regardless of errors. Let’s continue to use the shopping cart as an example. Let’s say, if you want to print the total number of items in the shopping cart during checkout, you can insert the defer statement in the checkout method like this:
func checkout() throws {
defer {
print("Number of items in shopping cart = (shoppingCart.items.count)")
}
guard items.count > 0 else {
throw ShoppingCartError.emptyCart
}
// Continue with the checkout
}
Now when you call the checkout method, it will print the “Number of items in shopping cart” message no matter if it can complete normally or there is an error.
If you test the checkout method in Playgrounds like this:
let shoppingCart = LiteShoppingCart()
do {
try shoppingCart.checkout()
print("Successfully checked out the items!")
} catch ShoppingCartError.cartIsFull {
print("Couldn't add new items because the cart is full")
} catch ShoppingCartError.emptyCart {
print("The shopping cart is empty!")
} catch {
print(error)
}
You should see two messages in the console:
Number of items in shopping cart = 0
The shopping cart is empty!
The defer statement is especially useful for cleanup operation:
func aMethod() throws {
// Open some resources such as opening a file
defer {
// Release the resources and perform cleanup operations (e.g. close a file descriptor)
}
// Error handling (e.g. fails to load the file)
// Do something with the resources
}
In Swift 1.2, you can use extensions to add new functionalities to an existing class, structure or enumeration. Say, you can add a new feature to the String class by using an extension:
extension String {
func contains(find: String) -> Bool {
return self.rangeOfString(find) != nil
}
}
Not only can you create extensions for classes, Swift 2 allows developers to apply extensions to protocol types. Prior to Swift 2, protocols contain only method and property declarations. You’re required to provide your own implementation when adopting the protocols in a class. I believe you should be very familiar with protocol implementation if you’ve used UITableView before.
class MyViewController: UITableViewDataSource, UITableViewDelegate {
func tableView(tableView: UITableView, numberOfRowsInSection section: Int) -> Int {
// Return the number of rows
}
.
.
.
}
With protocol extensions, you can add methods or properties to existing protocols. The is really powerful when you want to extend the protocol’s functionality. In addition to this, you can now provide default implementations for the methods defined in the protocols through extensions.
Let’s take a look at this example:
protocol Container {
var items:[String] {get set}
func numberOfItems() -> Int
}
class ToolBox: Container {
var items:[String] = ["Glue Stick", "Scissors", "Hammer", "Level", "Screwdriver", "Jigsaw"]
func numberOfItems() -> Int {
return items.count
}
}
class PaperBag: Container {
var items:[String] = ["Bagel", "Baguette", "Black bread"]
func numberOfItems() -> Int {
return items.count
}
}
class Basket: Container {
var items:[String] = ["Orange", "Apple", "Honeydew", "Watermelon", "Pineapple"]
func numberOfItems() -> Int {
return items.count
}
}
var container:Container = ToolBox()
print(container.numberOfItems())
We declare a protocol called Container. Inside the protocol, it has a method declaration called numberOfItems. For any class that adopts the Container protocol, it must implement the method to return the total number of items in a container.
In the above example, we have three classes to model a toolbox, a paper bag and a basket. Each class adopts the Container protocol to return the number of items stored in the specific container. If you run the code in Playgrounds, it prints out the number of items stored in the toolbox (i.e. 6). By using protocols, you can easily assign the `container` variable with another object that adopts the Container protocol:
var container:Container = ToolBox()
container = Basket()
print(container.numberOfItems())
As you may notice, the implementation of the numberOfItems method in these classes are identical. Prior to Swift 2, you cannot provide a default implementation in the protocol. But now you can do that through protocol extensions:
extension Container {
func numberOfItems() -> Int {
return items.count
}
}
With the default implementation, the three classes can be simplified like this:
class ToolBox: Container {
var items:[String] = ["Glue Stick", "Scissors", "Hammer", "Level", "Screwdriver", "Jigsaw"]
}
class PaperBag: Container {
var items:[String] = ["Bagel", "Baguette", "Black bread"]
}
class Basket: Container {
var items:[String] = ["Orange", "Apple", "Honeydew", "Watermelon", "Pineapple"]
}
They all come with the default implementation of the numberOfItems method. In case the default implementation doesn’t fit your need, you can still override it. Here is an example:
class Basket: Container {
var items:[String] = ["Orange", "Apple", "Honeydew", "Watermelon", "Pineapple"]
var bonusItems:[String] = ["Blueberry", "Blackcurrant", "Durian"]
func numberOfItems() -> Int {
return items.count + bonusItems.count
}
}
Suppose you want to add a new method called randomItem, which randomly returns an item, to the protocol. In Swift 1.2, you would need to add the method to the Container protocol.
protocol Container {
var items:[String] {get set}
func numberOfItems() -> Int
func randomItem() -> String
}
In this case, all the classes that adopt the Container protocol are required to change and provide the implementation of the randomItem method.
With the introduction of protocol extensions, you can easily add the new method to the extension and all the classes that conform to the protocol can have the implementation for free.
extension Container {
func numberOfItems() -> Int {
return items.count
}
func randomItem() -> String {
let randomIndex = Int(arc4random_uniform(UInt32(items.count)))
return items[randomIndex]
}
}
Isn’t it great? Swift 2 greatly expands the reach of protocols. Here I just elaborate the basics of protocol extensions. You can further leverage the power of protocol-oriented programming that I am not going to cover in this article. If you’re interested, you can check out this great WWDC video.
If all users are forced to upgrade to the latest version of iOS, this would make our developers’ life much easier. In reality, however, your apps have to cater for different versions of iOS (e.g. iOS 7 and iOS 8). If you just use the latest version of APIs in your app, this will cause errors when the app runs on older versions of iOS. When using an API that is only available on the latest version of iOS, you will need to do some kinds of verification before using the class or calling the method.
Prior to Swift 2, there is no standard way to do availability check. As an example, the NSURLQueryItem class is only available on iOS 8. If you use the class on older versions of iOS, you’ll end up with an error and that probably causes an app crash. To prevent the error, you may perform the availability check like this:
if NSClassFromString("NSURLQueryItem") != nil {
// iOS 8 or up
} else{
// Earlier iOS versions
}
This is one way to check if the class exists. Starting from Swift 2, it has built-in support for checking API availability. You can easily define an availability condition so that the block of code will only be executed on certain iOS versions. Here is an example:
@available(iOS 9, *)
class SuperFancy {
// implementation
}
You use the #available keyword in a if statement. In the availability condition, you specify the OS versions (e.g. iOS 8, OSX 10.10) you want to verify. The asterisk (*) is required and indicates that the if clause is executed on the minimum deployment target and any other versions of OS. For the above example, the body of the if will be executed on iOS 8 or up, and other platforms such as watchOS.
Similarly, you can use guard instead of if for checking API availability. Here is another example:
guard #available(iOS 8.4, OS X 10.10, *) else {
// what to do if it doesn't meet the minimum OS requirement
return
}
This is one way to check if the class exists. Starting from Swift 2, it has built-in support for checking API availability. You can easily define an availability condition so that the block of code will only be executed on certain iOS versions. Here is an example:
@available(iOS 9, *)
class SuperFancy {
// implementation
}
If you try to use the class on Xcode projects that supports multiple versions of iOS, Xcode will show you the errors below:

Prior to Swift 2, you usually use println() function for printing a message to console or log files. In the latest version of Swift, we can only use print() to write something to the output. Apple has combined both println() and print() functions into one. The print() function, by default, prints your message with a newline character. If you do not want to output something with a newline, you can set the appendNewline parameter to false. Here is an example:
print("Engine started", appendNewline: false)
I hope you enjoy reading this beginner’s guide of Swift 2. There are some features that I haven’t explored. You can further refer to this WWDC video to learn more about Swift 2. As of today, some companies are still using Objective-C as the primary programming language for iOS. Probably you’re still programming in Objective-C too. I firmly believe that Swift is the way to go and you’ll see more companies to hire Swift programmers. In fact, nearly all demos at WWDC 2015 were in Swift. So if you’re starting a new project, now is the time to develop it in Swift.
Subscribe to our 7-day email course for free tutorials about Swift and iOS programming. You'll also receive a free beginner guide of Swift 2 in PDF/ePub format and the related Playgrounds file.