Today, we’ll talk about a feature of several well-known Git tools that I prefer to call a “merge request,” but tends often to be referred to as a “pull request,” for example, on sites like GitHub and Bitbucket. Using Git-based merge requests tends to promote cooperation, participation, and collaboration among software team members while they’re developing code on mid-sized to large projects. By requiring each software feature or fix to be encapsulated into a formal and easily-identifiable “entity,” for lack of a better term, pull requests also lend a much-needed sense of structured flow to Git which is, from my perspective, inherently informal in its flow.
As with most aspects of software development, there is no one-size-fits-all model. While merge requests may work wonders on some teams, they may cause confusion with other groups of developers. Pull requests are overkill on very small projects.
Since I work in a full range of software development contexts, from large projects with hundreds of members to small projects with as few as 2 to 5 members, and since full-fledged adoption of this nascent technology is still gaining ground, in this article, just as in my client base, I’ll refer to merge requests throughout this article as “pull requests,” “PRs,” “merge requests”, and “MRs.” This will help readers become adaptive, capable of understanding software terminology regardless of where they’re working.
I myself only saw the start of widespread use of merge requests by my clients several years ago. Technically, they’re not that new, but practically, pull requests are still in the process of being adopted across the Git community.
An Overview of Merge Request
Merge requests provide us with two direct benefits:
- Encapsulating software features or fixes into readily-identifiable containers
- Promoting cooperation, participation, and collaboration by team members while they’re developing software code features and fixes.
When I say “container,” I mean that Git value-added service providers like GitHub, Bitbucket, and GitLab have all clearly defined what constitutes a merge request. They’ve also enabled development teams to apply unique and meaningful identifiers to each merge request. Communication tools that encourage team member collaboration are built into each merge request.
Generally, a merge request is made up of a distinct code branch that was created (split off) from whatever branch your team has identified as your project’s penultimate (best, correct, and truthful) publicly-releasable branch — many will immediately think master. The MR contains a pointer to the penultimate (master) branch. The service provider makes it easy for you to identify and compare code in your feature/fix branch with the penultimate branch. You are provided the ability to merge your feature/fix branch into the penultimate branch.
In fact, you should be provided with sophisticated merge tools. The merge request provides a central meeting place where team members can communicate specifically about the feature/fix branch. Commits/pushes to the feature/fix branch are tracked by the merge request.
Team members can easily see differences between the penultimate branch and the feature/fix branch. All team member discussions about the feature/fix branch are recorded in the merge request — and discussions associated with each distinct commit/push are shown as distinctly related to each distinct commit/push. Discussions and corresponding commits/pushes are stored in chronological order.
Hooks are provided so that each commit/push can be run through a continuous integration (CI) and continuous delivery and deployment (CD) pipeline. Hooks are provided so that other third party tools can be integrated with merge requests, for example, content management systems that allow meta data about source code, like design documentation, expected timelines, and feature/fix priorities, to be associated with the MR’s feature/fix Git branch.
Warnings and Recommended Reading
Let me break this to you gently: If don’t understand Git, get to know it before plunging into this article. Maybe that’s too harsh. Generally, I expect you to have at least intermediate working knowlege and proficiency in the use of source control management systems, especially Git. Specifically, this tutorial is meant for at least intermediate to expert Git users.
Here’s some recommended reading no matter how much of a Git expert you are. And remember, there really isn’t anyone who understands everything about Git, myself included.
- “Learn Git with Bitbucket Cloud”, Bitbucket
- “Gitflow Workflow”, Bitbucket
- “A successful Git branching model”, Vincent Driessen
- “Introduction to GitLab Flow”, GitLab
Best Practices
If you’re going to start using merge requests to add structure to your Git flow, start with a gentle introductory trial period. Pick just a few seasoned developers, especially ones whom understand Git and your Git tool of choice (i.e., GitHub). Assign them one feature or fix and see how it goes.
Whether starting with merge requests or whether they’re already part of your Git flow, try to keep the requirements for features and fixes simple and focused on as few issues as possible. For example, assignments shouldn’t be overly broad, like “add a settings screen with functionality.” Stay focused, like “allow the user to control location services in the preferences bundle; just use a UISwitch to enable or disable location tracking.”
With the Git flow model I personally prefer to use in mid- to large-sized projects, every feature and fix gets implemented in a separate branch. That branch is tracked, discussed, considered for merging, refined, and finally merged or rejected using a merge request.
Conventions
To keep things simple in this article, I myself will play all lead and development roles in the sample merge request that we’ll walk through. There will be the “team lead (me)” and the “developer (me).”
You know that in most real-life projects, there would be multiple development team members and multiple Git/GitHub user accounts. But here, when playing certain roles or changing roles, I’ll write things like “the developer (me) is about to commit and push a new feature branch to the remote” or “the team lead (me) is going to review and comment on the most recent merge request.”
A Simple Environment
In most mid- to large-sized projects, I encourage a Git branching model as described by Atlassian in this article. But my article here is didactic in nature. I don’t want to try to introduce and explain merge requests using a complex and heavy branching configuration to which I just linked. This has one master, one develop, and many feature, defect, and (tagged) release branches. I want you to easily read and understand my presentation. So we’ll discuss a project model in which there is only one master branch and possibly several feature/fix branches, and we’ll call this “master-feature.”
In this article, we’ll use the Git configuration provided by GitHub if you create a new default repository for your project — in other words, a Git configuration that starts with one default branch, master.
You should easily be able to extrapolate from my simplified master-feature configuration to the more complex master-develop-feature/defect-release-tag configuration. In fact, in some small projects, a master-feature/defect configuration may be all you need.
There’s an old idiom called “Occam’s Razor” which specifies that the simplest solution is generally the best one.
A Real-world Merge Request Scenario
To show you how a merge request works, I’ll create an Xcode project written using Swift with some basic functionality. Then I’ll implement a new feature in that project by creating a merge request and taking it through an entire, typical MR lifecycle.
As team lead (me), I’ll specify a new project requirement and assign implementation of that requirement to developer me. Then developer (me) will create a new Git feature branch, write some new code in that branch, and create a pull request using that branch. Developer (me) will assign my new merge request to team lead (me) for review. Team leader and developer will collaborate on refining the new feature branch code using the pull request as a means for communication. When team lead (me) is satisfied with refinements made to the feature branch by developer (me), team lead will the merge the refined feature branch into master for release. Both developer and team lead will work together — collaborate — using GitHub’s pull request support.
Generally, a “successful” pull request means that all participants have bought into the story behind a feature, have tuned or at least discussed the code for implementing that feature, and that the feature’s code is merged into the master branch for public release.
But “success” can also mean that the collective wisdom of the pull request’s participants have discovered that a proposed new feature or a fix doesn’t make sense for this project; that the feature/fix has fundamental design flaws; that the feature/fix would only make sense in the next version of the app, etc.
The sample project can be found on GitHub. The history of the pull request we’ll walk through in this article is available for you to inspect, like here and here.
Following along
You’ll learn more if you recreate all the steps I demonstrate in this article. You can do it yourself like I did, playing the roles of developer and team lead, or you can have even more fun and use an existing team configuration on GitHub — or set up a new team — so you and your compatriots can fill the various, different team roles that usually work together on a merge request (developers, team leads, reviewers, Scrum Masters, etc.).
However you do it, I encourage you to at minimum interact with the GitHub interface as I do here (like this).
Creating the New Repo
You should all be familiar with how to create a Git/GitHub repo for an Xcode project. If you’re not, please read this article.
By following these steps, you should have one default branch named master from which you release code to your customers.
First Draft Code
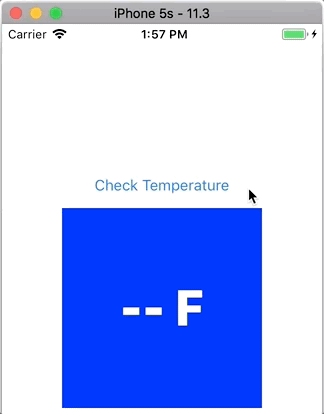
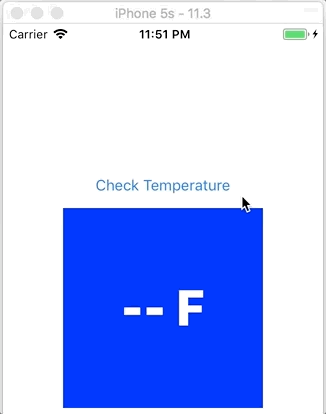
I created a simple Swift project with basic logic and user interface to provide the basis for a weather temperature checking app. It allows you to click on a button and get the current temperature in Fahrenheit (°F). I’ve mocked up a service for getting the current temperature. There are plenty of free APIs out there if you want to take this further and provide real weather info.
Here’s the first draft core code for the app:
|
1 2 3 4 5 6 7 8 9 10 11 12 13 14 15 16 17 18 19 20 21 22 23 24 25 26 27 28 29 30 31 32 33 34 |
import UIKit class ViewController: UIViewController { @IBOutlet weak var temperatureLabel: UILabel! override func viewDidLoad() { super.viewDidLoad() // Do any additional setup after loading the view, typically from a nib. // Initialize - we haven't checked temperature yet. temperatureLabel.text = "-- F" } override func didReceiveMemoryWarning() { super.didReceiveMemoryWarning() // Dispose of any resources that can be recreated. } // Get temperature, format for presentation, and // display on screen. @IBAction func checkTempButtonTapped(_ sender: Any) { let temperature = getTemperature() temperatureLabel.text = String(temperature) + " F" } // Mock up a weather/temperature service. func getTemperature() -> Int { return Int(arc4random_uniform(99)) } } |
In the course of managing this project, and since this was the first code written, team lead (me) reviewed this first version of our current temperature viewing app and found that the user interface/user experience (UI/UX) was not very exciting:

So, as team lead, I asked one of my developers to improve the UX with some animation.
Create a new feature branch
Developer’s first step is to create what’s called a “feature branch.” By putting new code into a separate branch, a development boutique can continue forward with app fixes, improvements, experimentation, etc., all without risking the code in the master branch. master is reserved only for app code in a state ready to be released to the public.
Many of you Git users know this already: To add a new feature or fix a defect, you pull from the latest develop or master remote to the corresponding local, and you branch off that latest local, giving the branch an appropriate name. Then you start working on the defect or feature independent of both the local and remote develop or master branches.
|
1 2 3 4 5 6 7 8 9 10 11 12 13 14 15 16 17 18 19 20 |
$ git branch -a * master remotes/origin/master $ git branch -r origin/master $ git checkout -b FEATURE-add-animation Switched to a new branch 'FEATURE-add-animation' $ git push -u origin FEATURE-add-animation Total 0 (delta 0), reused 0 (delta 0) remote: remote: Create a pull request for 'FEATURE-add-animation' on GitHub by visiting: remote: https://github.com/iosbrain/MergeRequestDemo/pull/new/FEATURE-add-animation remote: To https://github.com/iosbrain/MergeRequestDemo.git * [new branch] FEATURE-add-animation -> FEATURE-add-animation Branch 'FEATURE-add-animation' set up to track remote branch 'FEATURE-add-animation' from 'origin'. |
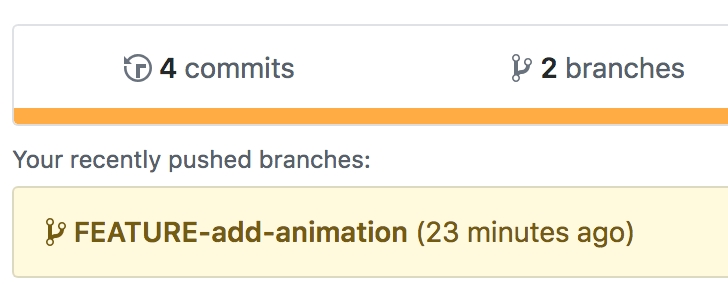
Notice that I immediately pushed my new local feature branch to origin to create a remote version that tracks the new local. Some may argue that this is an unnecessary step because I haven’t made any changes to my new feature branch yet. Those people may be right but, for the purposes of this article, I wanted you to be able to see that other team members can now see my new feature branch on the GitHub web interface.
Local and Remote Versions of the Feature Branch
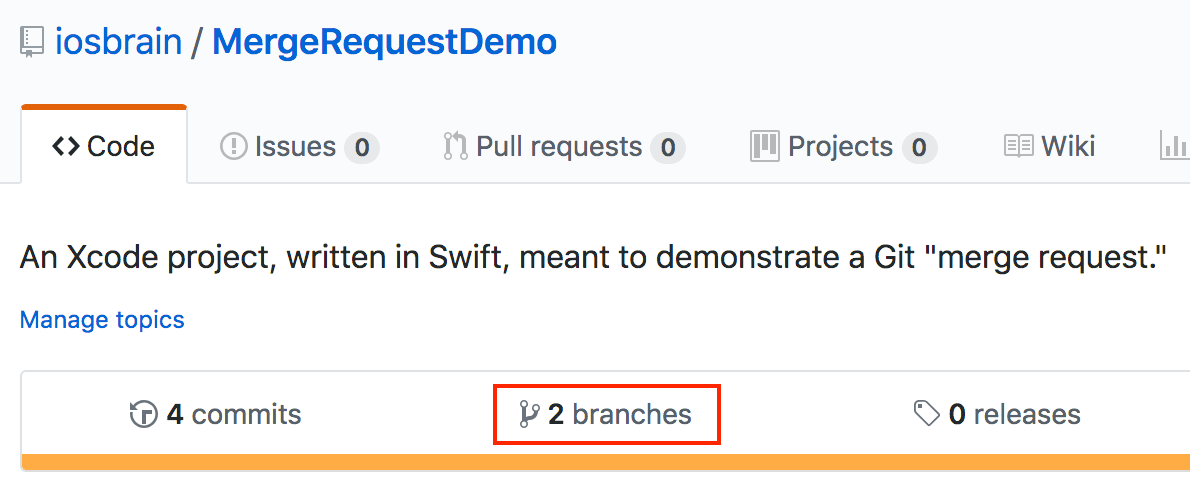
Here’s GitHub showing the new feature branch:
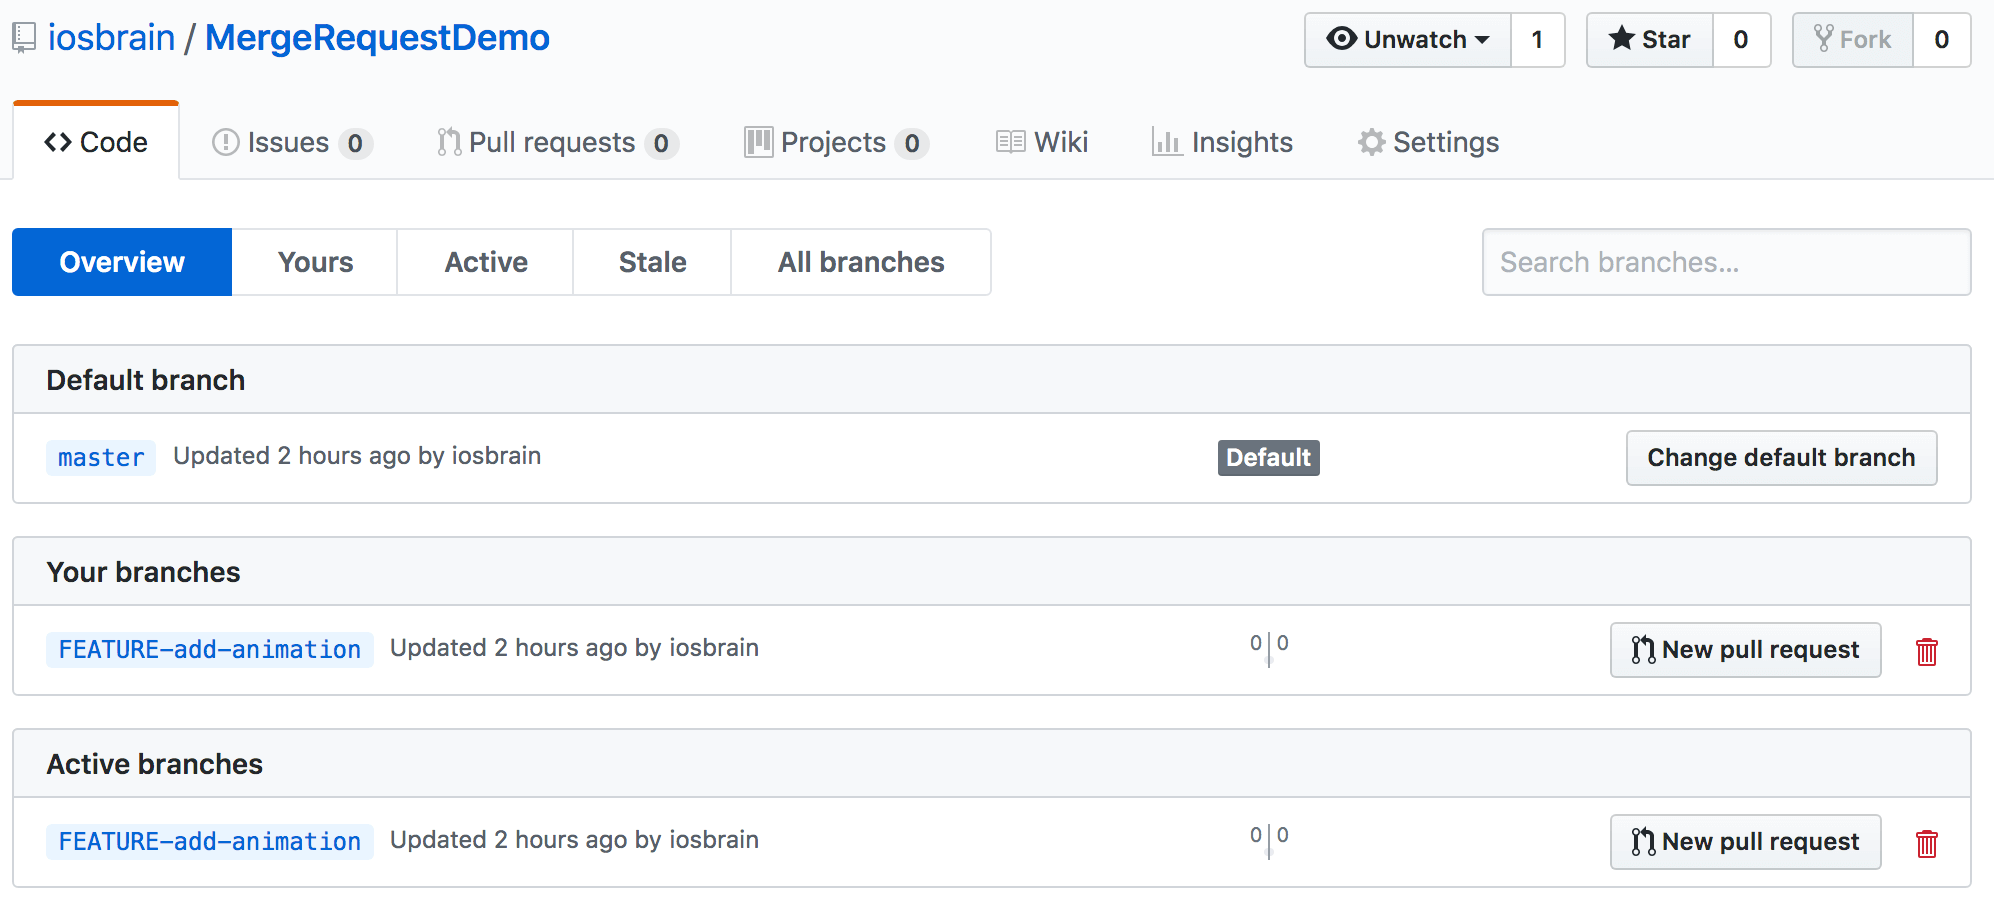
Here’s GitHub showing all project branches:
Here’s GitHub showing detail on all project branches:
Here are some Git commands for inspecting all project branches from Terminal, seeing the current branch, and for switching branches:
|
1 2 3 4 5 6 7 8 9 10 11 12 13 14 15 16 17 18 19 20 21 22 23 24 25 |
$ git branch -a * FEATURE-add-animation master remotes/origin/FEATURE-add-animation remotes/origin/master $ git branch -l * FEATURE-add-animation master $ git checkout master Switched to branch 'master' Your branch is up to date with 'origin/master'. $ git checkout FEATURE-add-animation Switched to branch 'FEATURE-add-animation' Your branch is up to date with 'origin/FEATURE-add-animation'. $ git branch -r origin/FEATURE-add-animation origin/master |
First Version of the New Feature
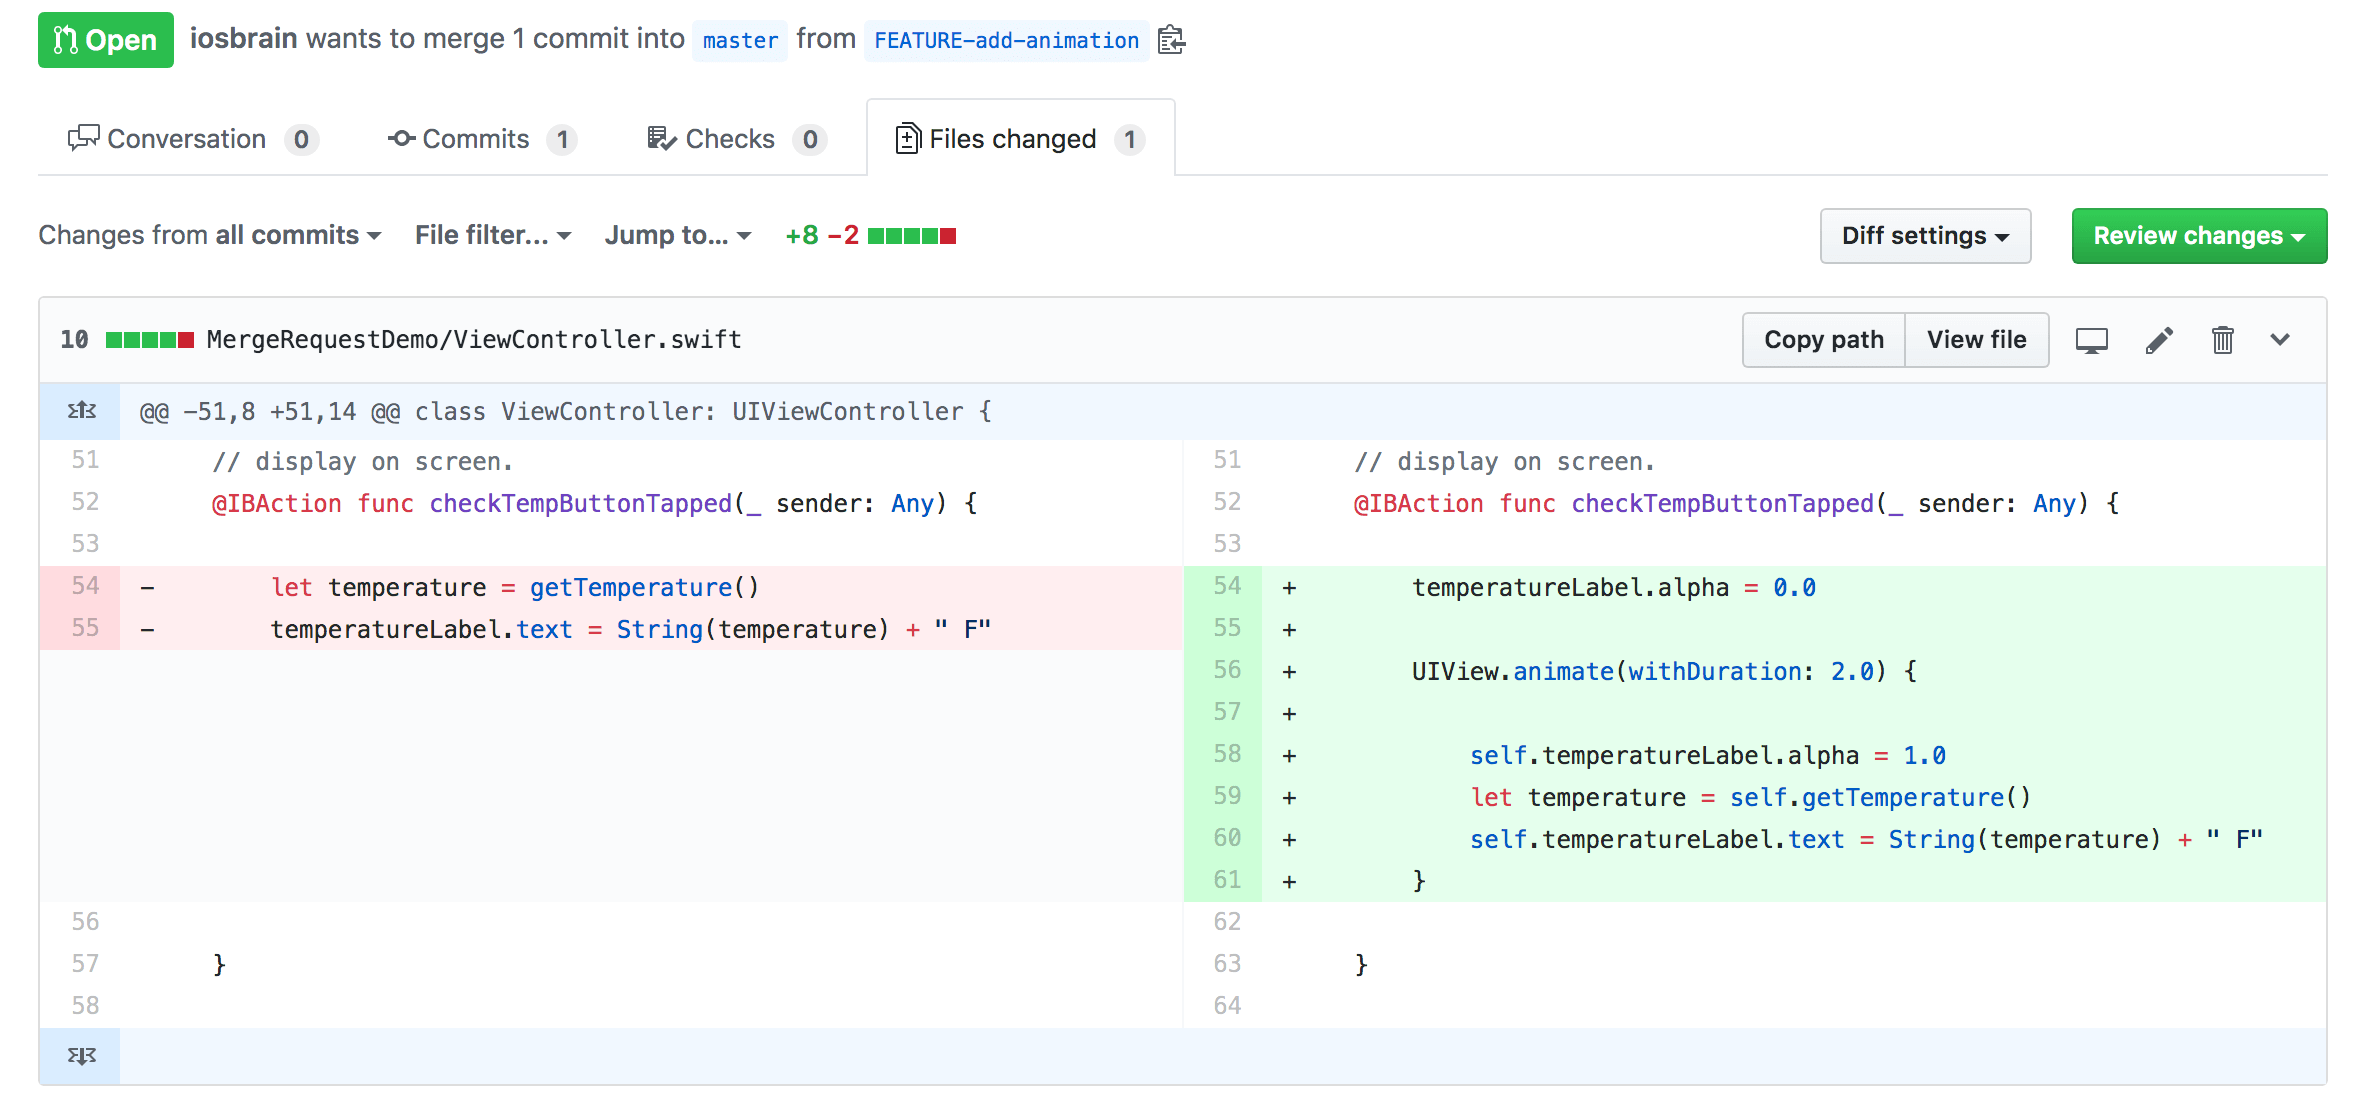
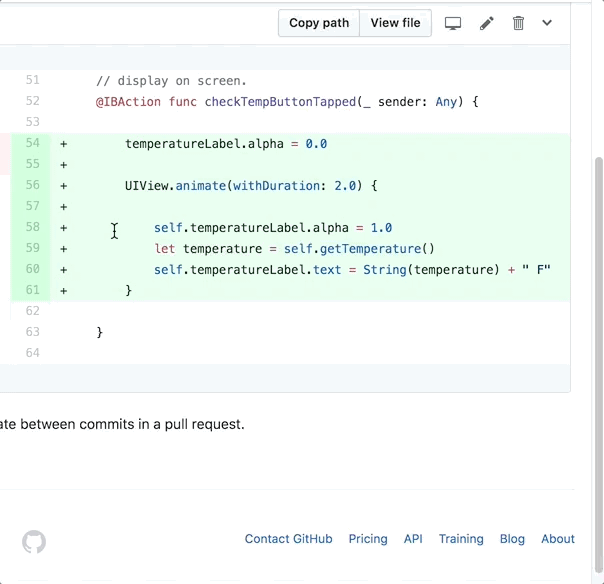
Developer (me) was assigned the task of spicing up the temperature app’s UX. I added the following code to branch FEATURE-add-animation:
|
1 2 3 4 5 6 7 8 9 10 11 12 13 14 15 16 |
... // Get temperature, format for presentation, and // display on screen. @IBAction func checkTempButtonTapped(_ sender: Any) { temperatureLabel.alpha = 0.0 UIView.animate(withDuration: 2.0) { self.temperatureLabel.alpha = 1.0 let temperature = self.getTemperature() self.temperatureLabel.text = String(temperature) + " F" } } ... |
As the developer, I then committed my new code and pushed it to the remote FEATURE-add-animation branch:
|
1 2 3 4 5 6 7 8 9 10 11 12 13 14 15 16 17 |
$ git add MergeRequestDemo/ViewController.swift $ git commit -m "Added some animation." [FEATURE-add-animation 2b34e33] Added some animation. 1 file changed, 8 insertions(+), 2 deletions(-) $ git push origin FEATURE-add-animation Counting objects: 4, done. Delta compression using up to 8 threads. Compressing objects: 100% (4/4), done. Writing objects: 100% (4/4), 462 bytes | 462.00 KiB/s, done. Total 4 (delta 3), reused 0 (delta 0) remote: Resolving deltas: 100% (3/3), completed with 3 local objects. To https://github.com/iosbrain/MergeRequestDemo.git 40333c3..2b34e33 FEATURE-add-animation -> FEATURE-add-animation |
Now everyone on the project can see this change. If other team members go to the project’s main page on GitHub, they can view and click on the branches tab:
Then they’ll see that developer me has updated FEATURE-add-animation:
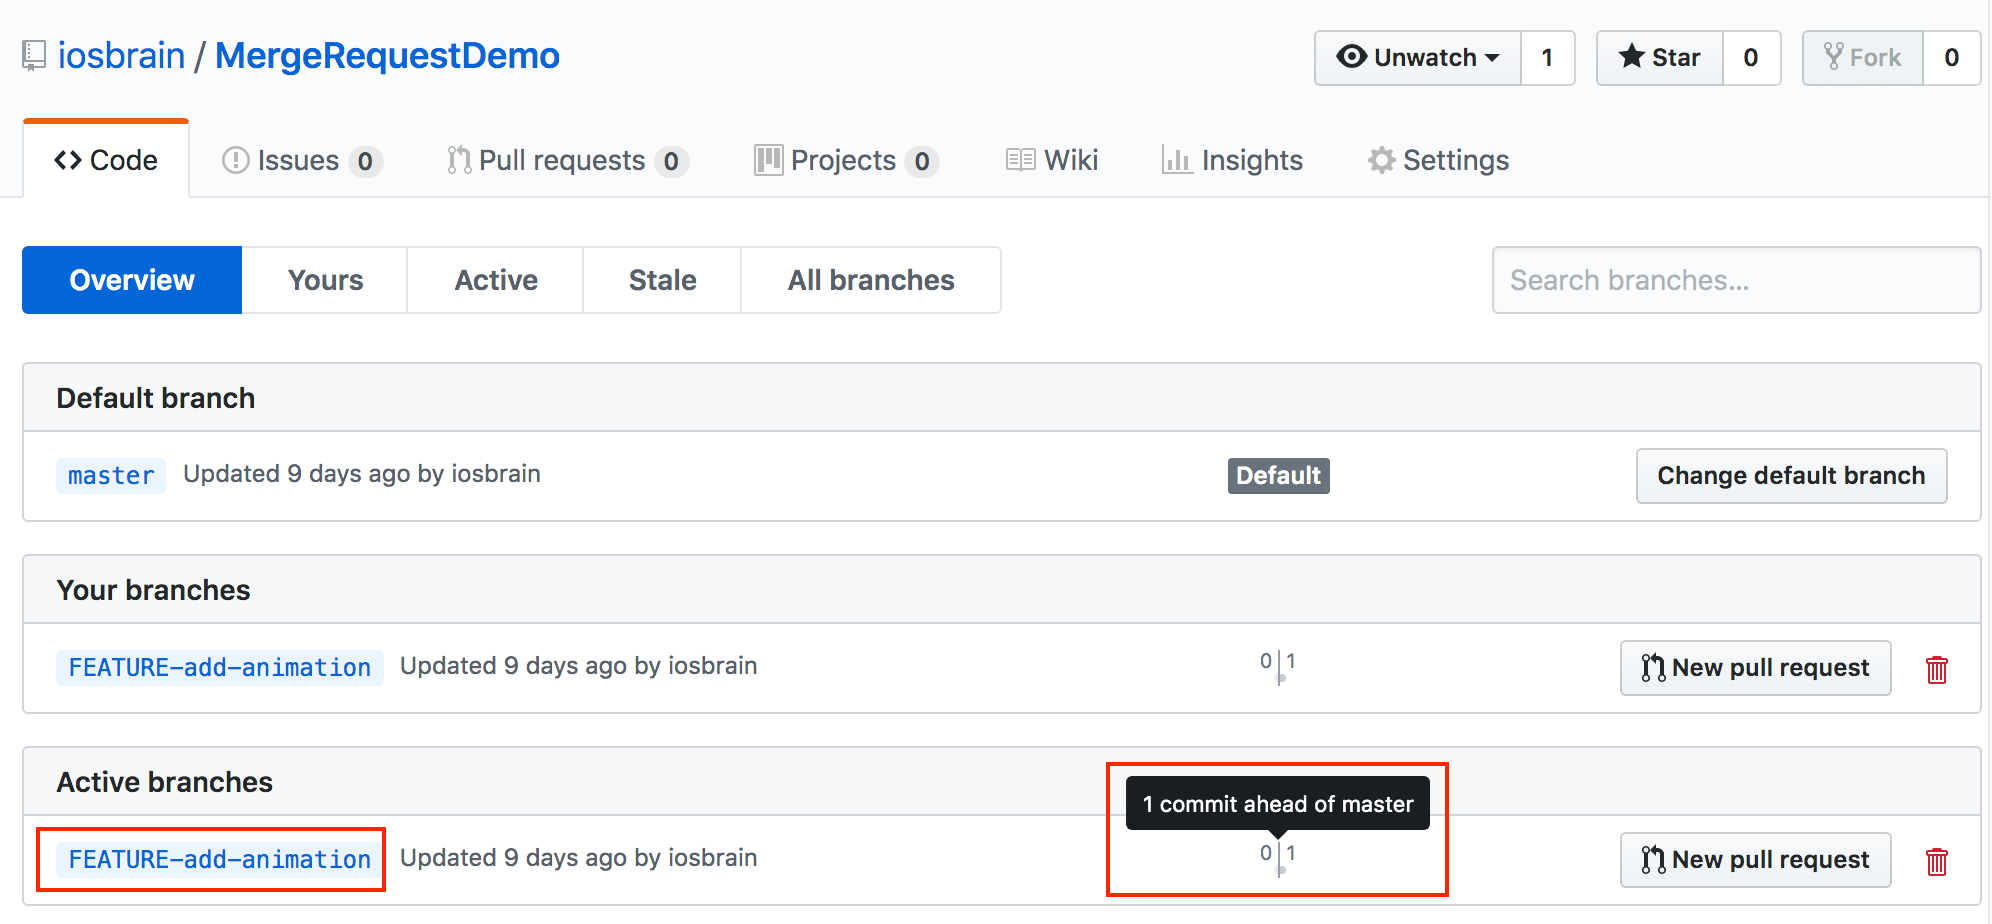
Notice that GitHub emphasizes that developer me has added new code to FEATURE-add-animation by visually presenting the fact that my feature branch is now “1 commit ahead of master.”
What to do with the New Feature Branch
What does a team without a well-defined Git flow do now? Does developer email team lead to ask that the feature branch be approved and merged into master? What if there were a way to highlight the fact that branch FEATURE-add-animation should be discussed by some or all team members to elicit technical input and creative input, and ensure that the new branch’s code adheres to standards, etc?
There is a way to get other team members involved. We can do so by having developer me create a merge request, or as it’s called on GitHub, a pull request.
Creating a Merge Request
Developer should announce to team lead (and others on the team) that I’ve taken a stab at encoding animation in the app. I do this by using a feature supported by value-added Git software suites like GitHub, GitLab, or Bitbucket. From GitHub:
Create a pull request to propose and collaborate on changes to a repository. These changes are proposed in a branch, which ensures that the master branch only contains finished and approved work.
Pull requests can only be opened if there are differences between your branch and the upstream branch. You can specify which branch you’d like to merge your changes into when you create your pull request. …
Let’s go to GitHub and walk through this process. I like to start this process on the branch overview page, similar to the flow we used above, like so:
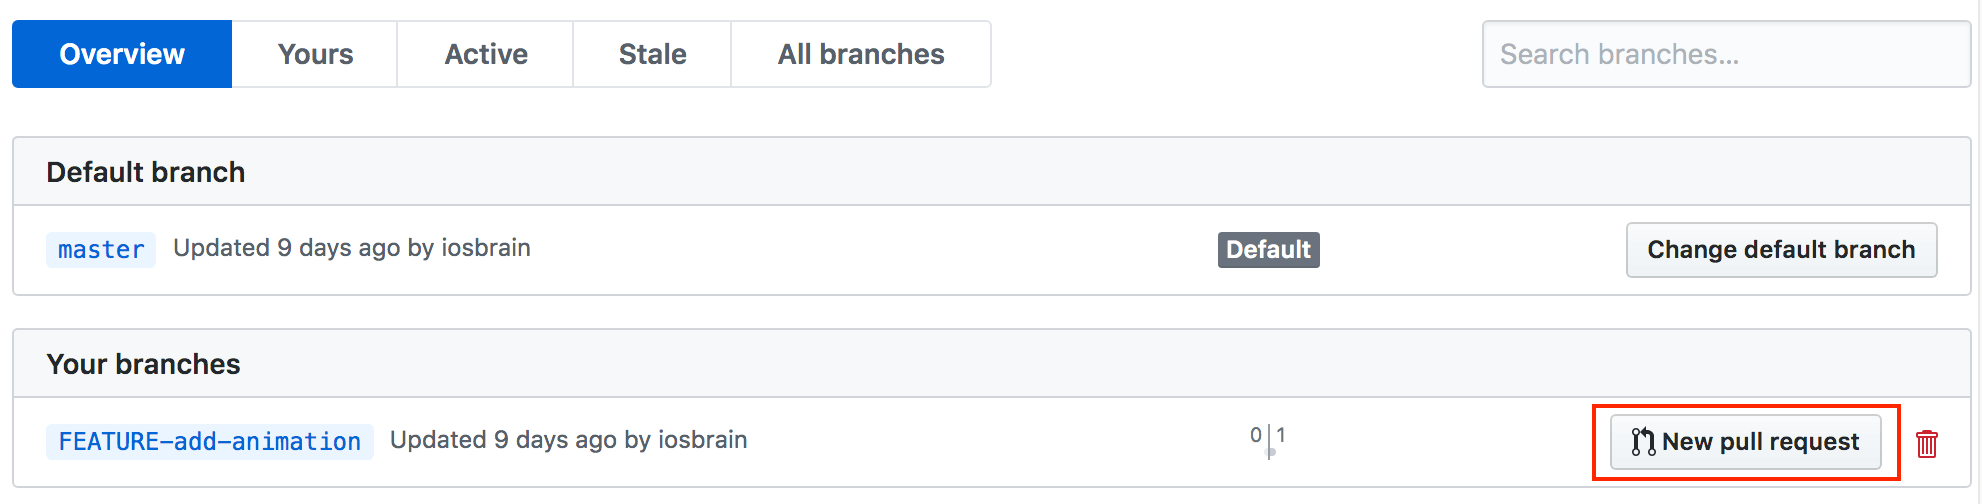
Developer (me) will push the “New pull request” button next to my feature branch, as shown in the previous image. Since this is a new merge request, the first thing I do is select my feature branch and set it to be eventually merged into master. After all, master is the branch from which my hypothetical team does its releases. Note that GitHub’s documentation states:
When thinking about branches, remember that the base branch is where changes should be applied, the head branch contains what you would like to be applied.
Besides making sure I’ve selected the proper base and head branches, I can edit the title for my MR (which has been pre-filled with my last commit message) and add detailed commentary if I want:
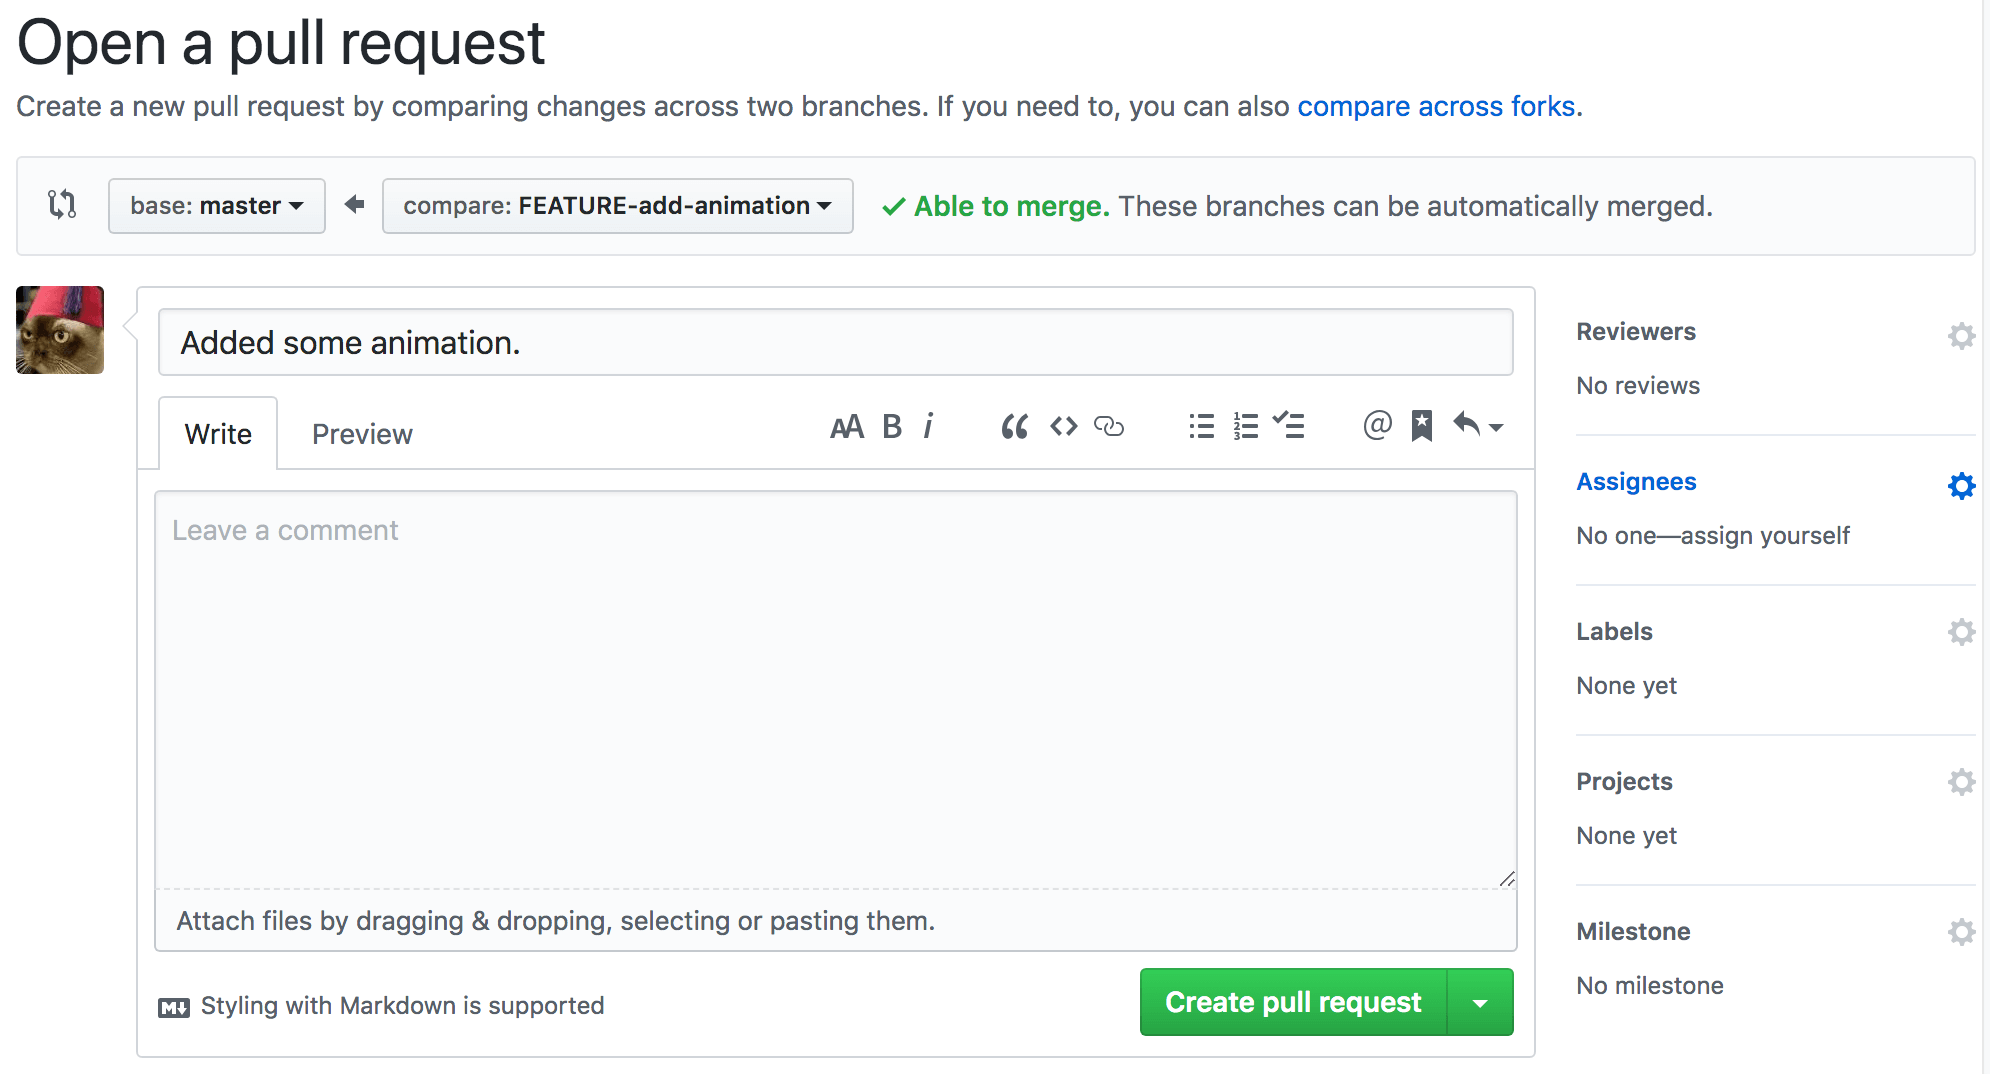
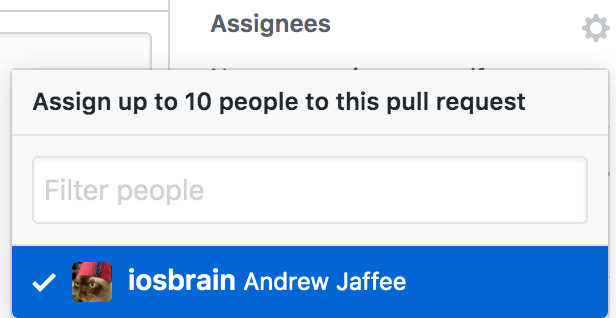
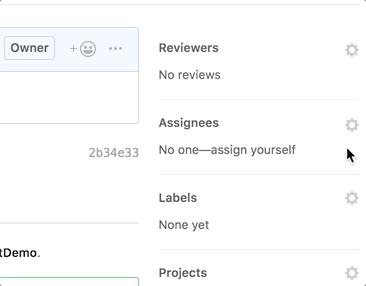
Before hitting the green “Create pull request” button, I should consider to whom I’ll assign this MR for review and possible further coding. Remember that the purpose of MRs is “to propose and collaborate on changes to a repository”. Developer is going to select team lead as an “Assignee.” In terms of overall Git flow, generally I like to let the team lead decide if she/he wants to just merge the new feature as is, send it back to developer for changes, ask developer questions, ask others for input, reassign the branch to another developer, etc.:
Now press that “Create pull request” button.
Responding to Merge Requests
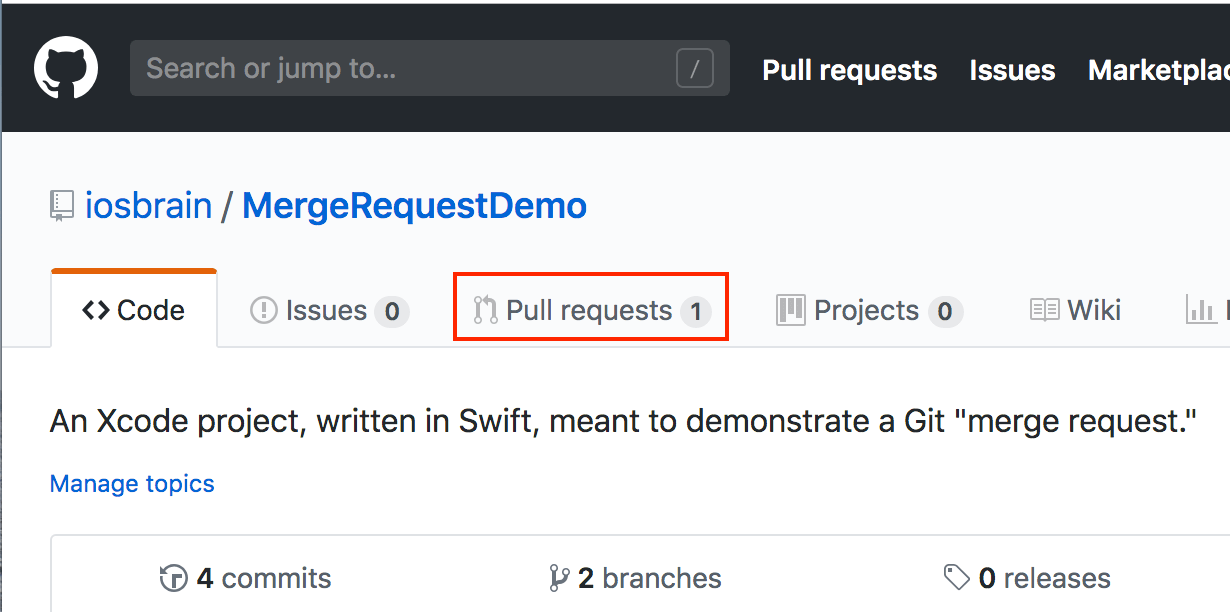
Because merge/pull requests have become so important to the workflow of numerous software development shops, they are made obvious on sites like GitHub. In fact, the “Pull requests” tab is the first tab you’ll probably notice when navigating to the GitHub site:
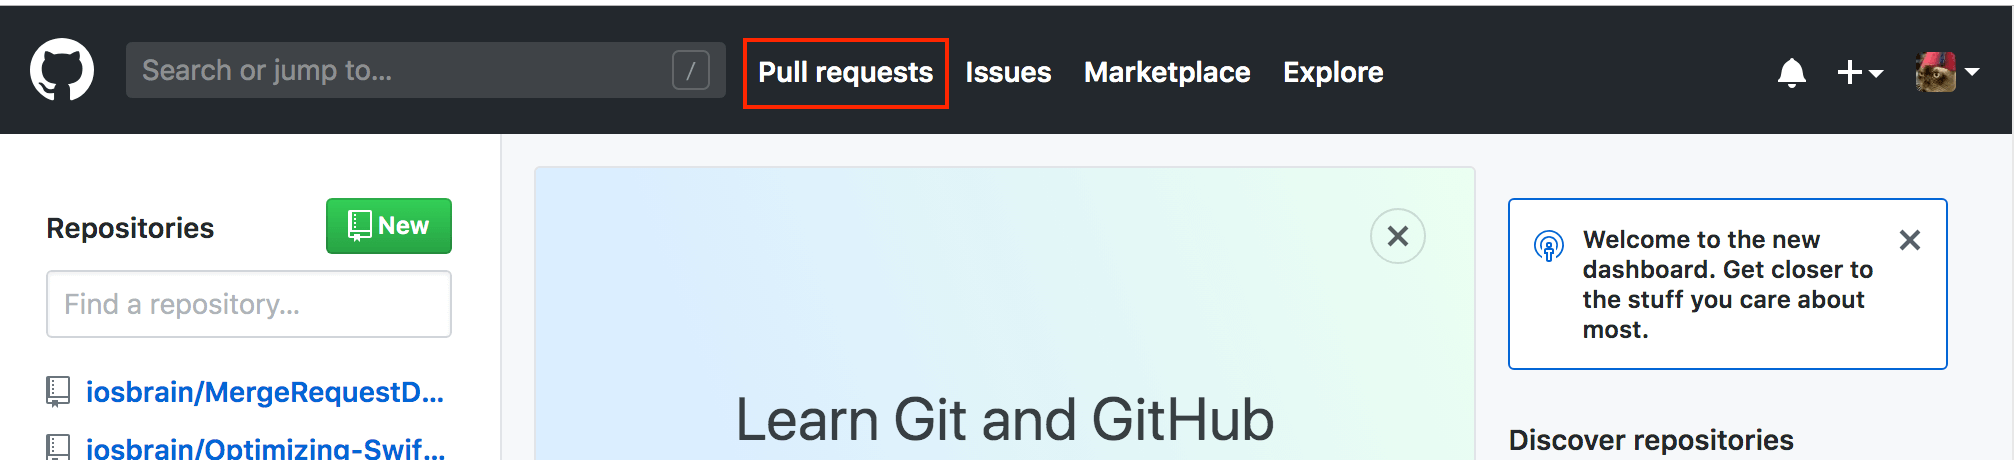
If you’re working on an active GitHub project, you’re going to be loading the remote repo’s home page frequently, and it’s hard to miss the “Pull requests” tab. Clicking on it regularly is a best practice for you to see what’s going on with your project:
Clicking “Pull requests” shows me an overview of the project’s MRs:
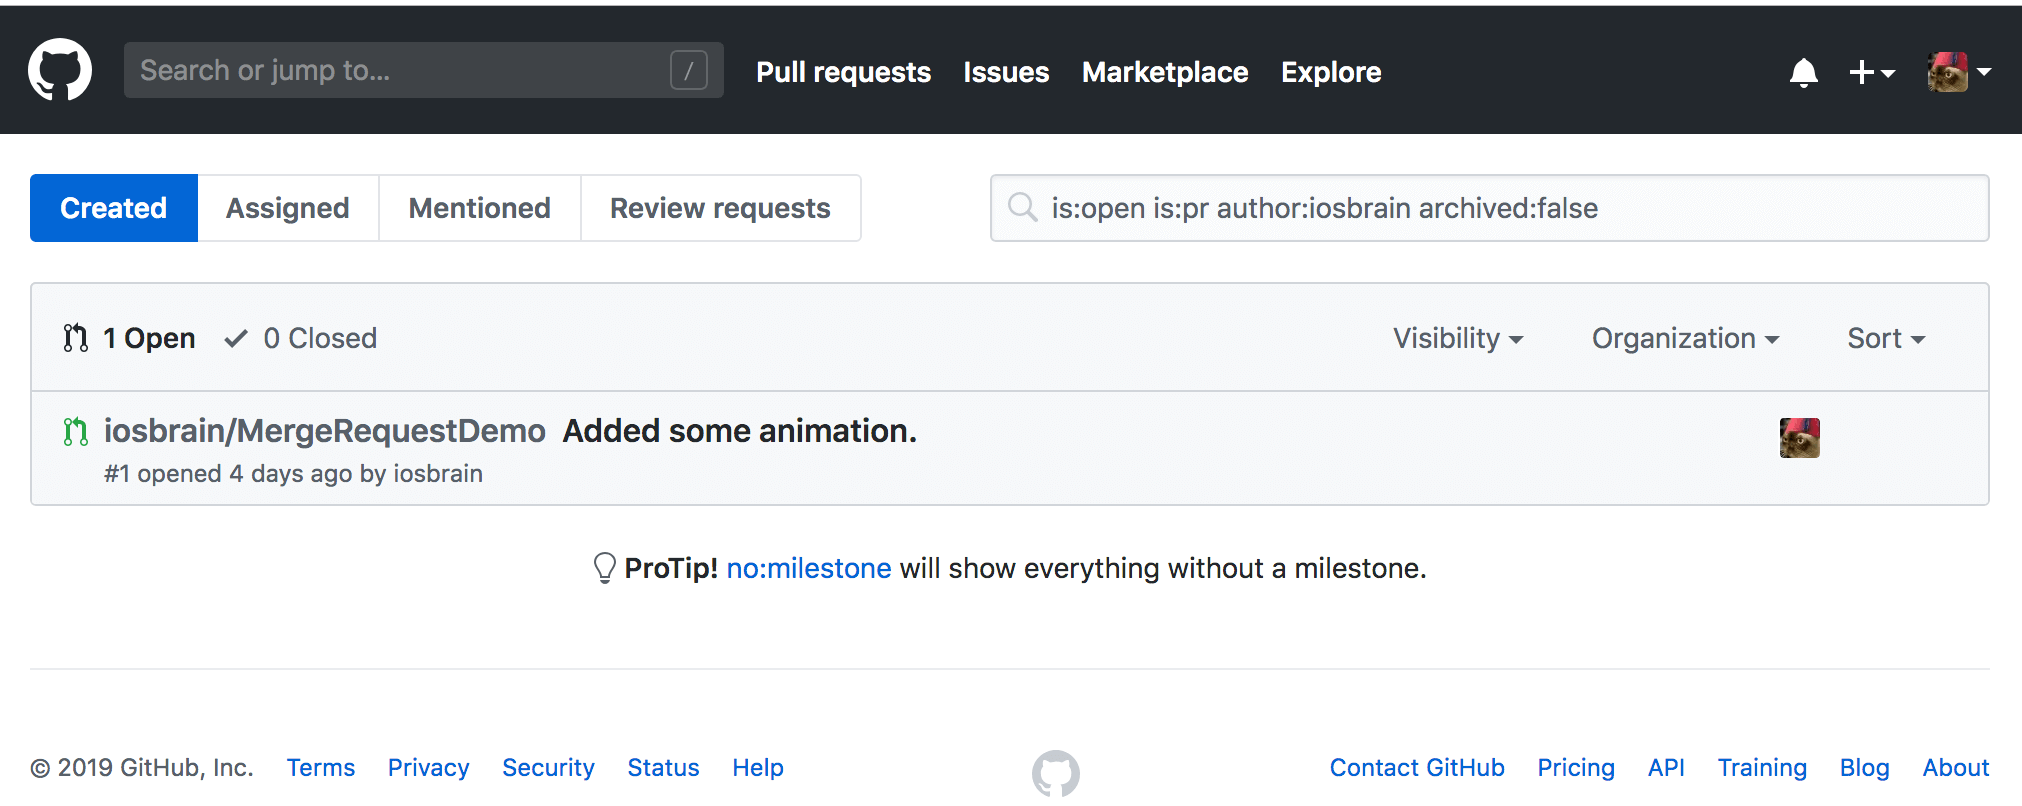
What a list of Merge Requests can Tell me about a Project
Clicking the “Pull Requests” button or tab on GitHub will show me all MRs assigned to me for review, ones where I should respond to comments, ones I’ve been asked to review, or ones I’ve been assigned to work on, among other things. Also shown are essentials like how many MRs of mine are currently in process (“Open”) and a history of previous MRs (“Closed”). The closed MRs can often be very helpful in remembering features or defects I’ve worked on — and I can even look at code I wrote, and diffs, and discussions elaborating on the decision-making required to encode, for example, a story, and that discussion comprises a project history, so that I can remember why I coded a certain feature a certain way for whatever reasons. That history may also show me a something like a key algorithm that is demonstrative of the app’s core purpose.
But history goes even deeper. I can look at MRs assigned to specific developers and determine essential metrics on say, which developers turned stories into features the fastest, which developers delivered the highest quality code, which developers required the most help and took longest to encode features/fixes, and even which developers (or other team leads) provided the highest quality feedback over time.
Inspecting your Pull Requests
Here, I have only one pull request, but in a typical project, I’d have several or more likely, many assigned to me:
I click on my MR to look at its details. When working with clients whose Git flows are based around the merge request model, I check my MRs frequently — whether on GitHub, GitLab, Bitbucket, etc. On GitHub and most all other similar sites, I can get a lot of good information by examining an MR assigned to me:
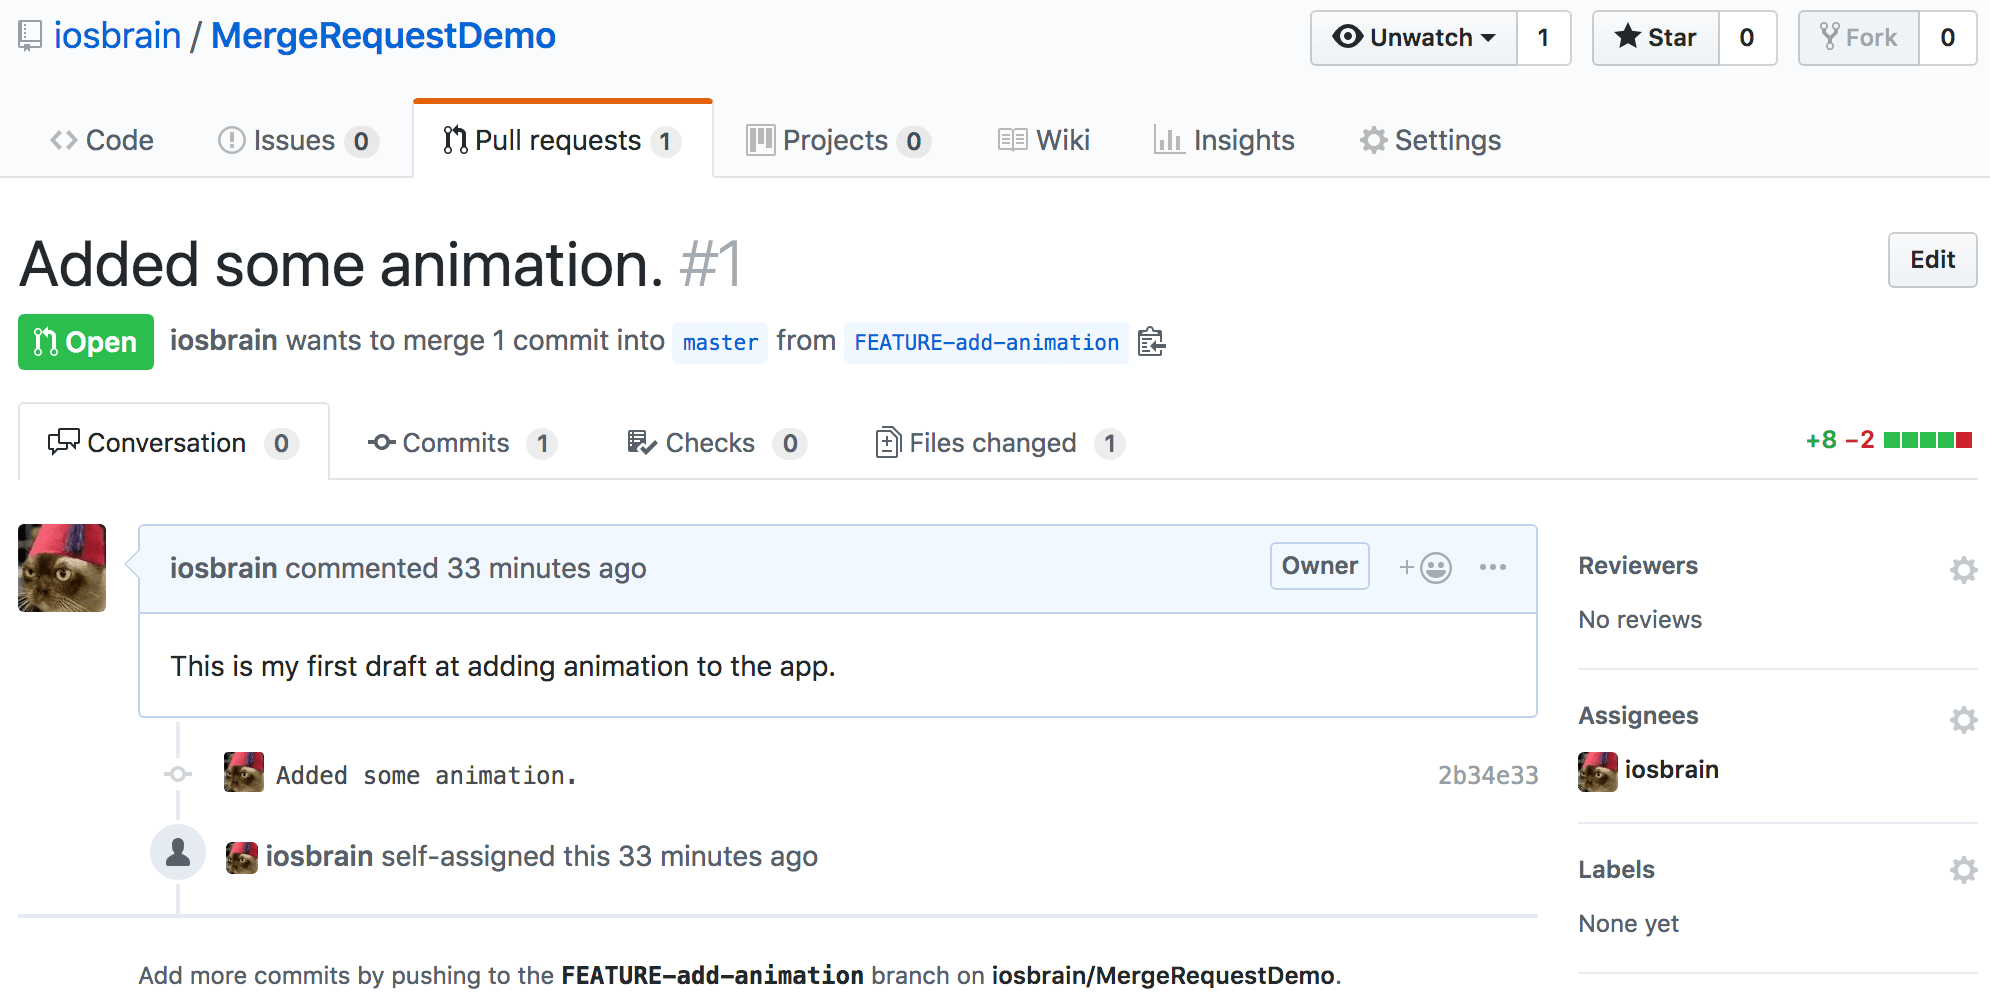
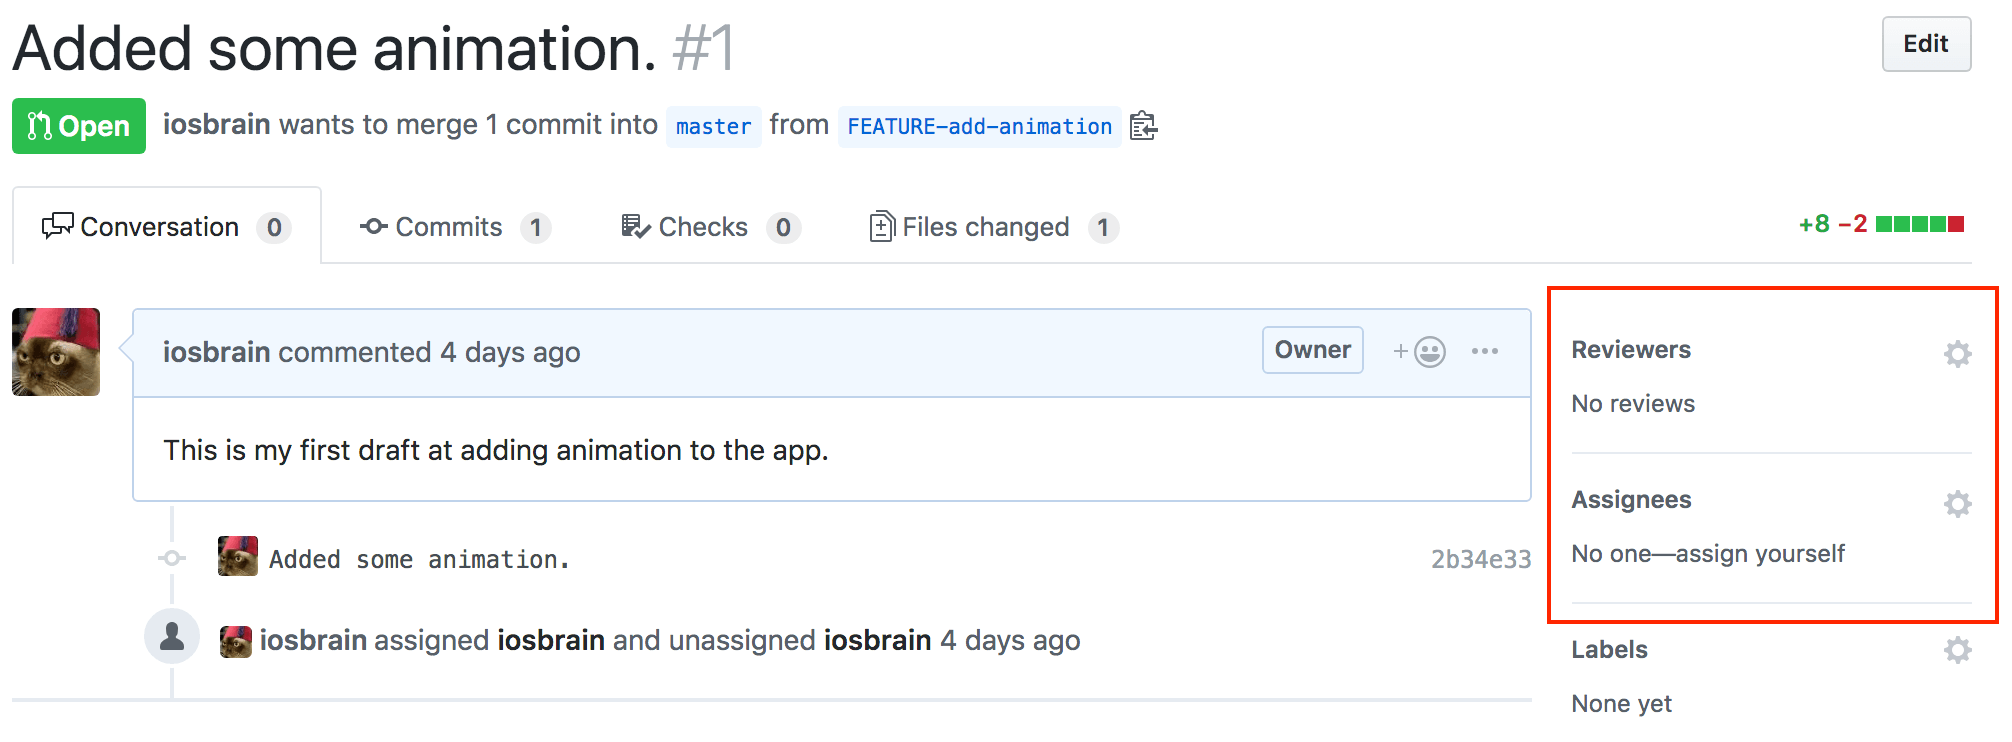
Immediately obvious to me is the fact that this MR is still “Open,” I can see a chronological history of events, and perhaps most importantly, the phrase “iosbrain wants to merge 1 commit into master from FEATURE-add-animation” tells me a lot. Who out there knows how important this statement should be to any team lead or developer? This is all great info. Let me mention a few things that you can look into on your own. Scroll down the page a bit and you’ll see two things I’d like to highlight:
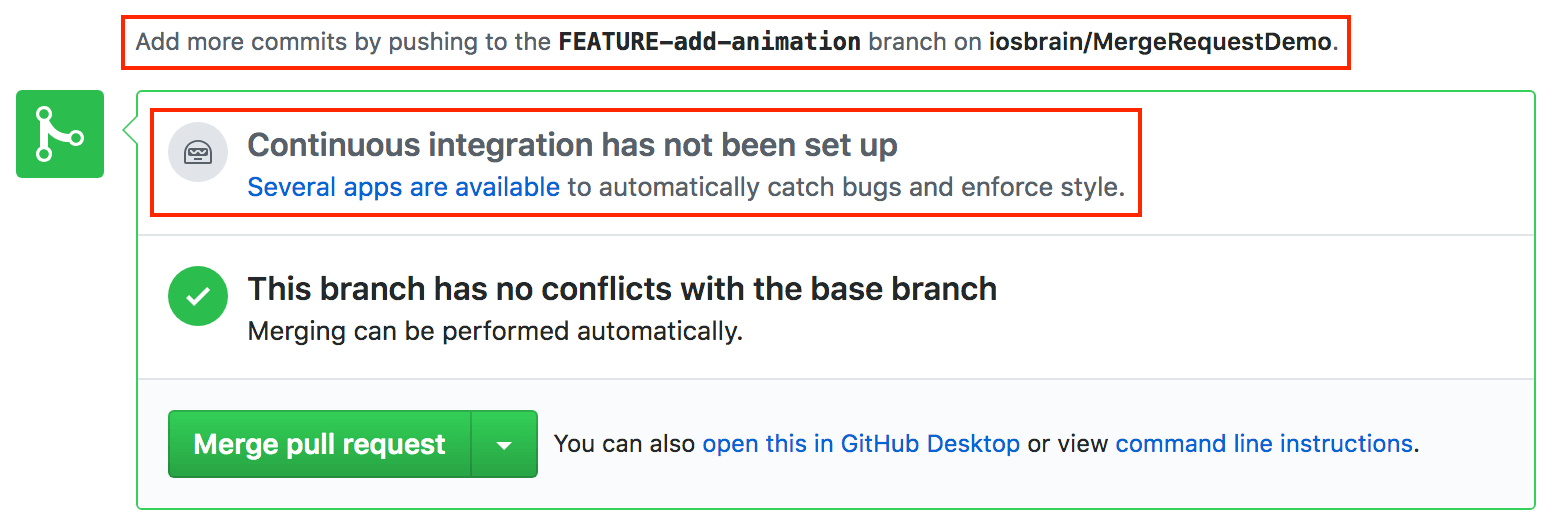
Notice the phrase highlighted at the top of the image. That’s telling developer me that I can commit and push from FEATURE-add-animation as many times as necessary to address the concerns of team lead me or other team members.
Now focus on the section of the image that I highlighted mentioning the fact that “Continuous integration has not been set up.” You’ll probably end up in a Git flow where CI/CD has been set up. Then you’ll find out whether your current branch’s commits/pushes made it through continuous integration. CI/CD is beyond the scope of this simple tutorial, but you should read up on the topic.
Notice that the MR itself has a menu bar. Let’s click the “Files changed (1)” tab:
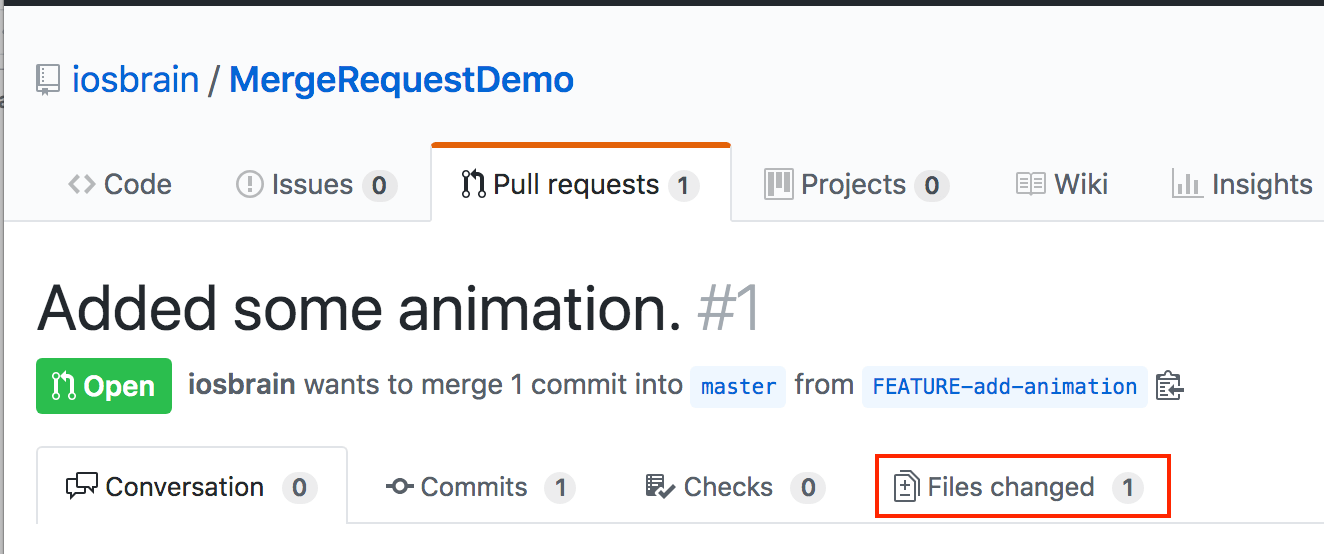
As you might expect, that tab shows, well, changes to source files, but most importantly, diffs so team members can see the changes made by developer me to the code:
It doesn’t get much better than this. By using MRs, we are dividing and conquering a project into manageable, logical, and focused pieces of code, source control flow, standard operating procedures, etc.
Discussing the Code
In this section, we’ll cover one of the most important features afforded by merge requests: The ability to tap into your development team’s collective knowledge and get feedback about code written in the branch attached to the pull request.
I’m team leader right now. Because I’m working by myself in my own GitHub account, I can only ask for feedback from myself, but that doesn’t help you readers out there.
If this were a particularly complex merge request and I needed or wanted advice from other people on my team, I want to click on the “Conversation” tab and concentrate on the column on the right-hand side of the screen:

If this were a more sophisticated feature, I could ask for input from other developers, other team leads — perhaps someone on the creative side, like a UI/UX specialist, or someone in management. I can assign reviewers and kick off a formal review process. I strongly encourage you to look over the links I just provided on formal reviews. This is a means of getting feedback on the merge request from almost anyone with access to your GitHub project.
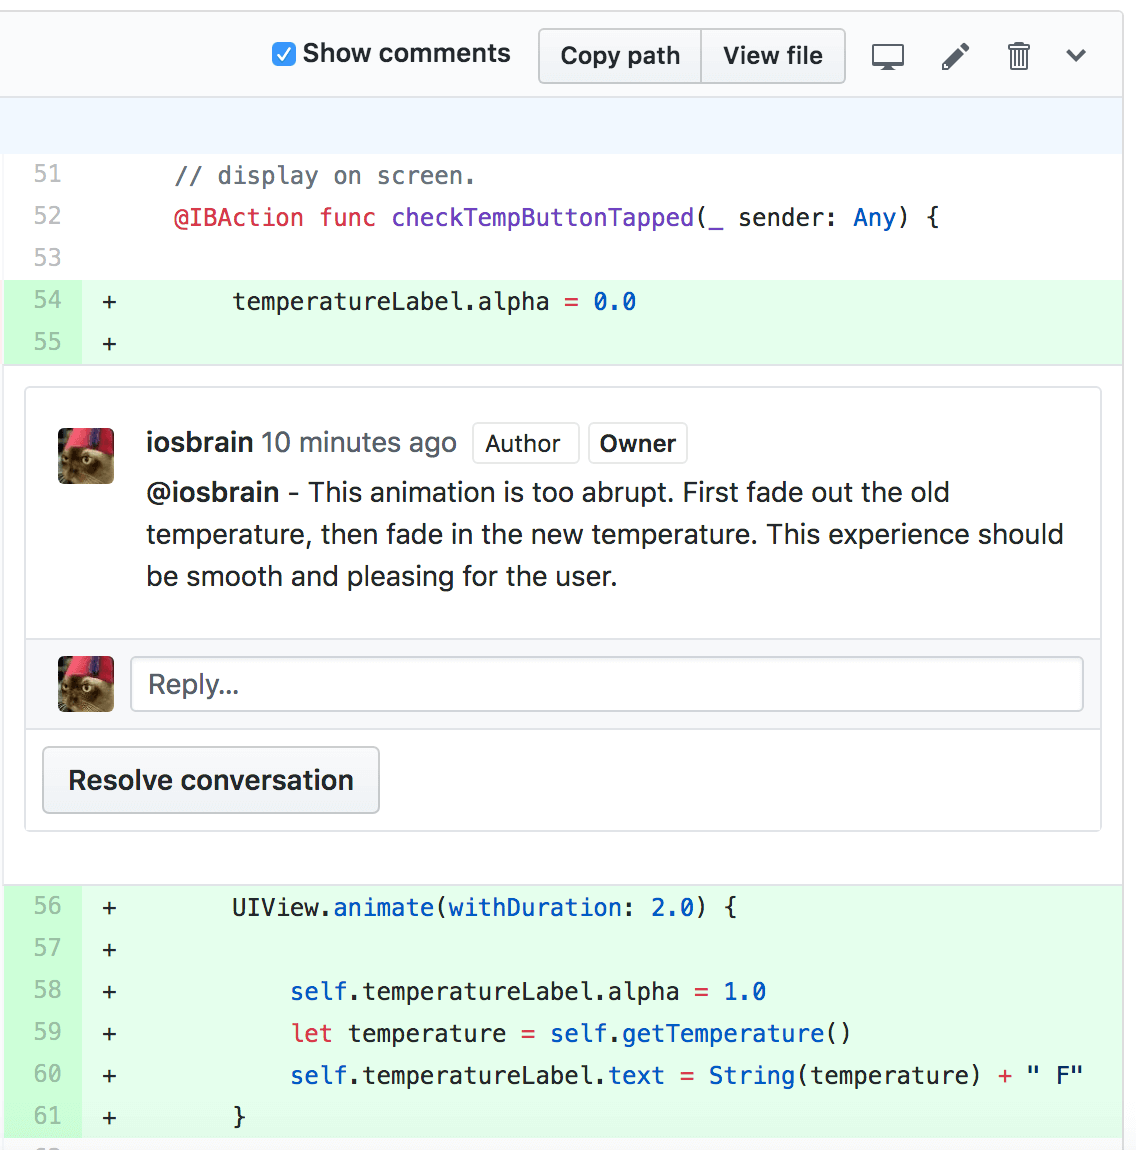
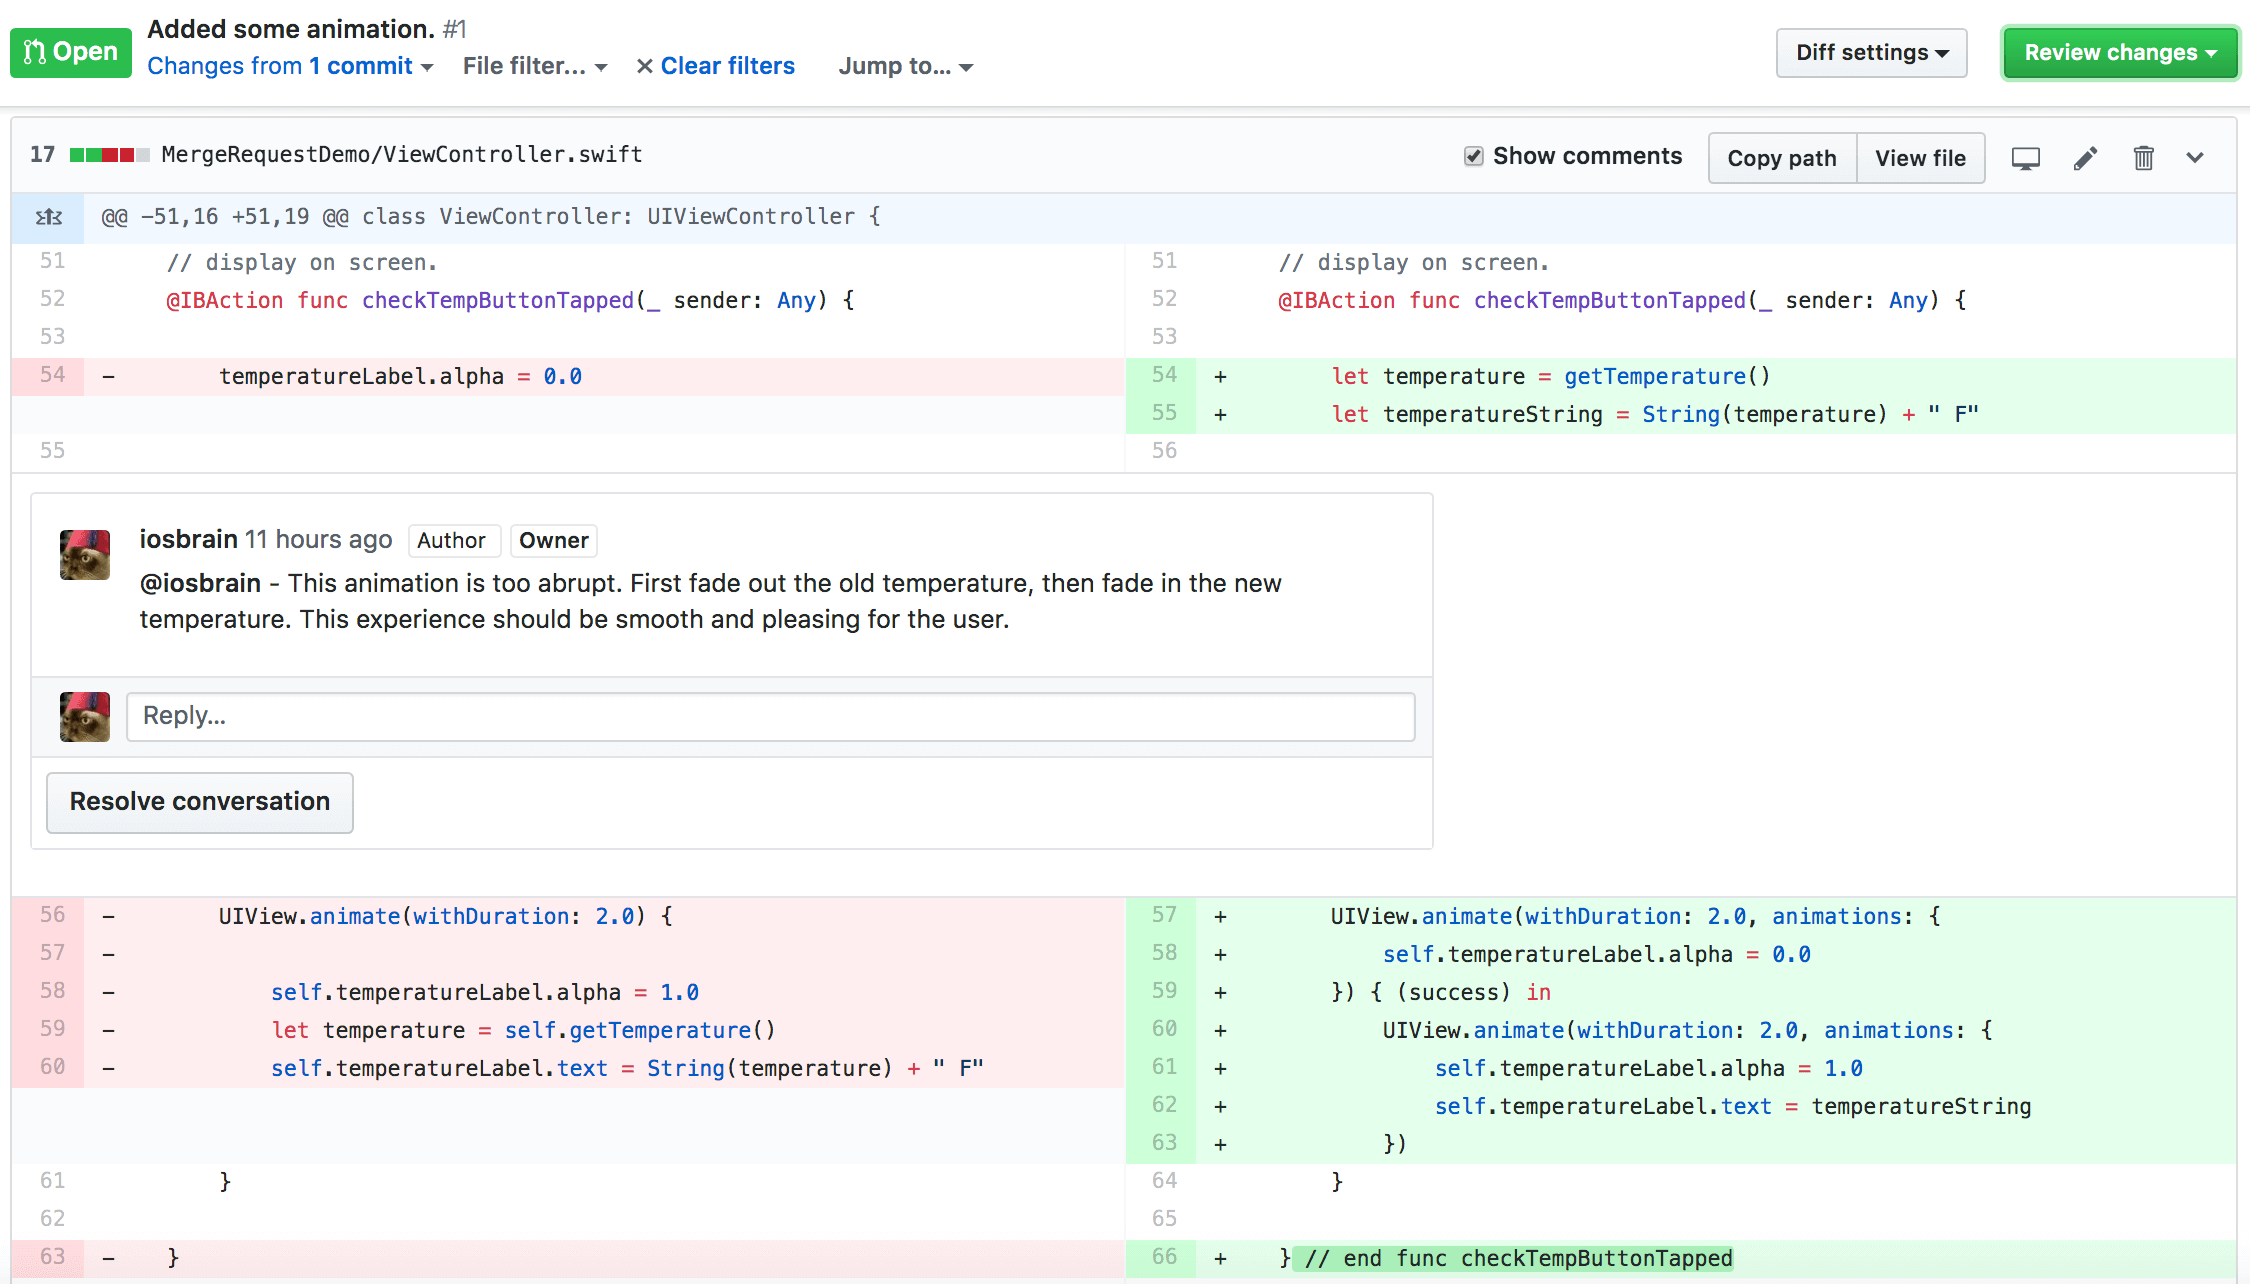
Say I click the “Files changed (1)” tab again. By looking at the code and asking the developer me for a demo, I call tell that the animation is OK, but not good enough for me:
One way to communicate to the developer, or other team members, is to leave comments in the pull request’s code (and diff) view. I can place comments on each line of code. Team lead is going to tell developer what I think about her/his solution and ask for changes:
You see how I was able to start a comment on a specific line number in the relevant code branch. I can get the attention of the developer by using the @ key-character, which autocompletes to a matching team member — in this case, developer me. Here’s the full comment that team leader me left for developer me:
If all your team’s GitHub notification settings are configured properly, developer, team lead, and other team members should receive a copy of this comment. The developer and team leader and others can go back and forth trading comments as long as they need to, and an audit trail of the conversation is archived in the MR.
As general practice, after team lead is satisfied with a round of commentary, I would now set the “Assignees” back to developer (me), thus sending the code back to the programmer to make the changes I elucidated in my comments.
Select developer (me) as one of the “Assignees” (on a team, I would probably use auto-search and autocomplete):
I emphasize again that the developer can make code changes and commit/push them to FEATURE-add-animation, the team lead can review those changes and ask for more changes, this cyclical process can go on as long as necessary, and that at some point the developer will write code that meets the team lead’s expectations.
Remember that we can go to the GitHub “Files changed (N)” tab and compare the master and FEATURE-add-animation branches to see how working code has progressed so far.
The purpose of a merge request is to get more people involved in the development process so that they can spot potential problems (like logic errors or usability problems), ensure that project protocols are followed (like code style/formatting rules), and once in awhile, someone comes up with feedback that is truly inspirational and changes the whole course of the project.
Final Version of the Feature
Developer saw team lead’s comments on the merge request. First, I make sure I’m in my FEATURE-add-animation branch and then I make the following code changes as per team lead’s comments:
|
1 2 3 4 5 6 7 8 9 10 11 12 13 14 15 16 17 |
... @IBAction func checkTempButtonTapped(_ sender: Any) { let temperature = getTemperature() let temperatureString = String(temperature) + " F" UIView.animate(withDuration: 2.0, animations: { self.temperatureLabel.alpha = 0.0 }) { (success) in UIView.animate(withDuration: 2.0, animations: { self.temperatureLabel.alpha = 1.0 self.temperatureLabel.text = temperatureString }) } } // end func checkTempButtonTapped ... |
Developer inspects my final animation:
I then commit and push my latest changes into FEATURE-add-animation.
|
1 2 3 4 5 6 7 8 9 10 11 |
$ git status On branch FEATURE-add-animation Your branch is up to date with 'origin/FEATURE-add-animation'. Changes not staged for commit: (use "git add <file>..." to update what will be committed) (use "git checkout -- <file>..." to discard changes in working directory) modified: MergeRequestDemo/ViewController.swift no changes added to commit (use "git add" and/or "git commit -a") |
After testing my code (and functional and UI testing), it’s ready to commit and push my code.
|
1 2 3 4 5 6 7 8 9 10 11 12 13 14 15 16 |
$ git add MergeRequestDemo/ViewController.swift $ git commit -m "Added fade out animation of old temperature. Then animated in new temperature." [FEATURE-add-animation dca55ac] Added fade out animation of old temperature. Then animated in new temperature. 1 file changed, 10 insertions(+), 7 deletions(-) $ git push origin FEATURE-add-animation Counting objects: 4, done. Delta compression using up to 8 threads. Compressing objects: 100% (4/4), done. Writing objects: 100% (4/4), 545 bytes | 545.00 KiB/s, done. Total 4 (delta 3), reused 0 (delta 0) remote: Resolving deltas: 100% (3/3), completed with 3 local objects. To https://github.com/iosbrain/MergeRequestDemo.git 2b34e33..dca55ac FEATURE-add-animation -> FEATURE-add-animation |
Since developer has pushed the latest code, I’ll want to set the “Assignees” on the pull request back to the team lead. We’ll see later that my latest changes are tracked by GitHub via the pull request.
Reviewing code one final time
Team lead will want to review the last commit by developer, check for any comments I added to the MR as developer and team lead may want to ask developer some questions (like “How did testing go?” — or… “Where’s your unit test!” 😜). Team lead could also grab the FEATURE-add-animation branch and run the code myself. So could other team members.
Team lead (me) will be notified by GitHub that developer (me) made changes to the code in the MR. I will use the MR interface to review the new code. I already showed you how to navigate the MR screens on GitHub. We’ll look at a couple of those screens now.
The main “Conversations” screen for this particular merge request will show a chronological summary of what’s happened during the lifetime of the request:
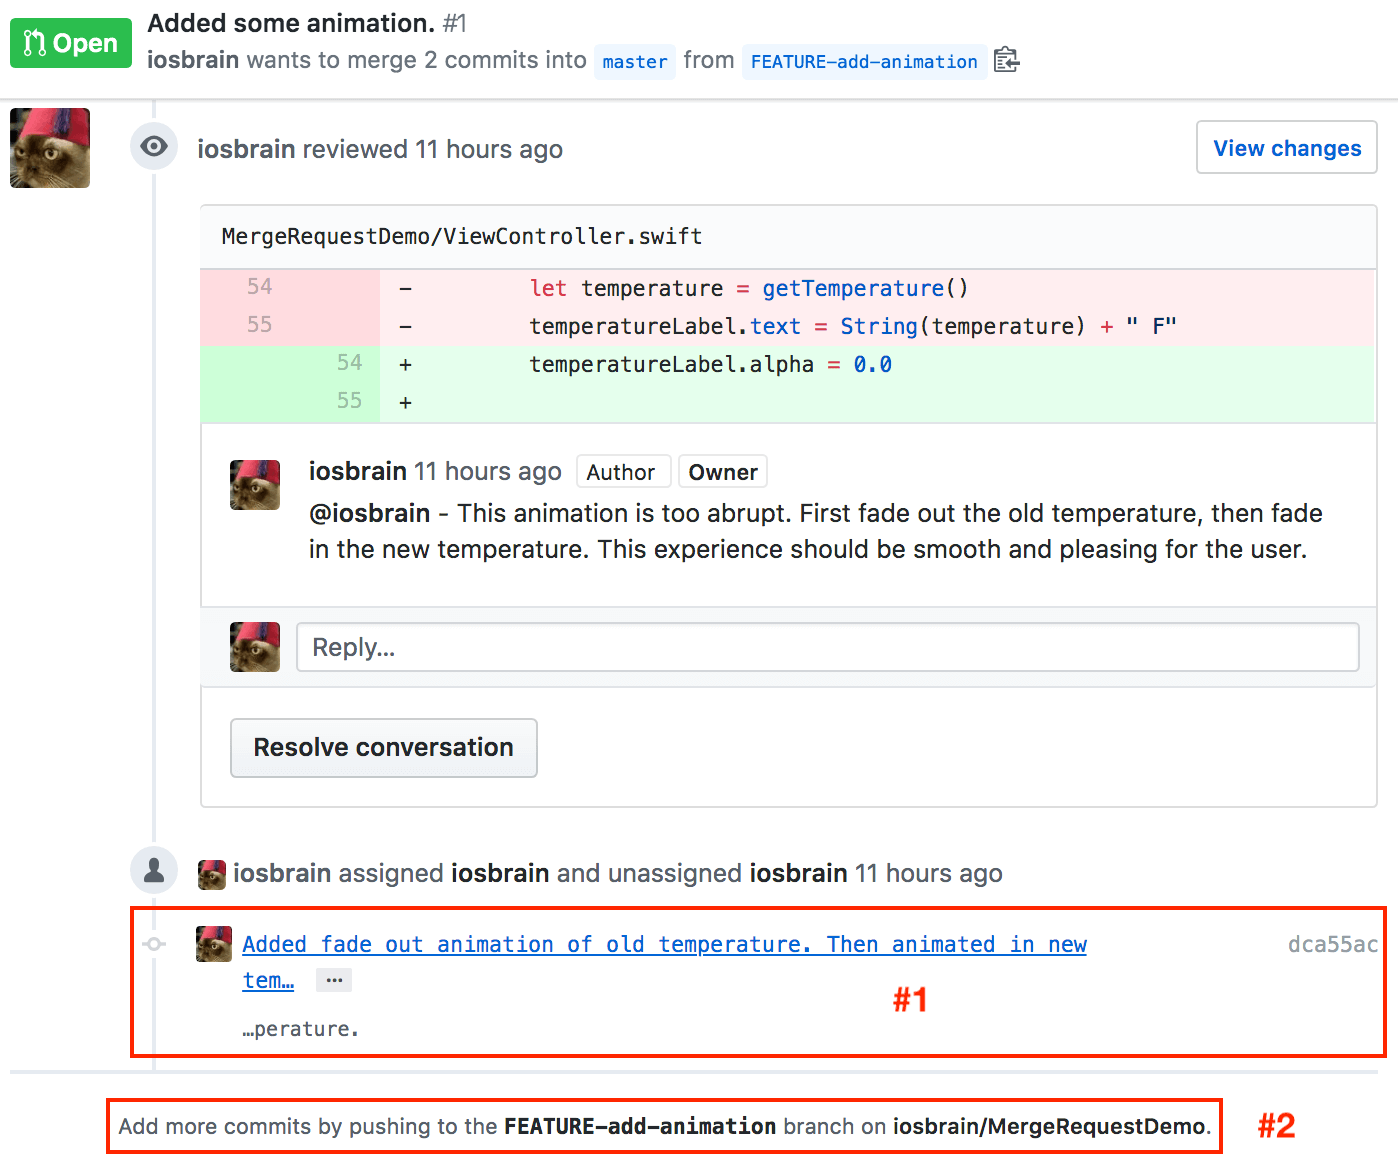
Most of this is self-explanatory. Notice I’ve highlighted some sections of the screen and numbered them “#1” and “#2.” Team lead clicks on #1 first. We’ll discuss that in a moment, but let me just plant this seed in your head: When I scroll further down the page, I see this:
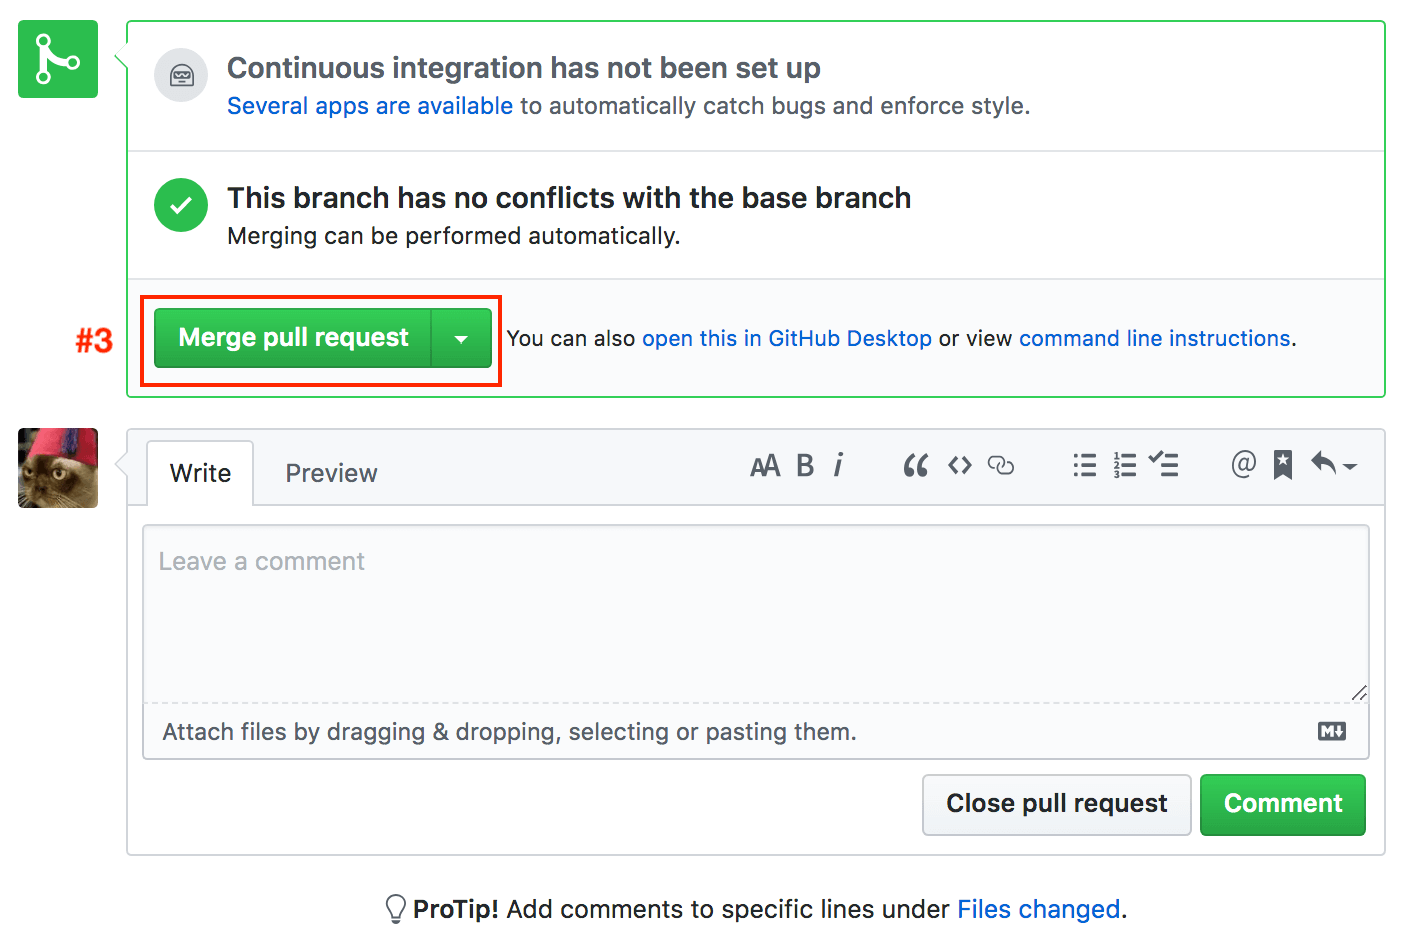
See that big green “Merge pull request” button that I’ve marked “#3?” We’ll also discuss that soon.
Discussion of #1, #2, and #3 — then merging
When I get notified about a pull request like this, team lead clicks on the link in #1 first. The screen section marked #1 represents the last action performed on this MR (developer me’s last commit/push). GitHub takes me to the following screen:
I can see the changes that developer (me) made to satisfy team lead’s last comments on this MR. Those comments are shown in the middle of the screen. Let’s assume that team lead is satisfied with the code and that I’ve asked developer to show the app running with FEATURE-add-animation branch code. Now we’re getting to the point of resolving a merge request, but wait…
Let’s not forget my annotation labelled #2. If team lead was not satisfied at this point, I could ask developer for more changes via another comment. Developer could go off and write more code and then commit/push. Then team lead could review the new code and… You now see how this could go on for awhile. Complex merge requests often take serious time. Anyway, back to where we were in the last paragraph…
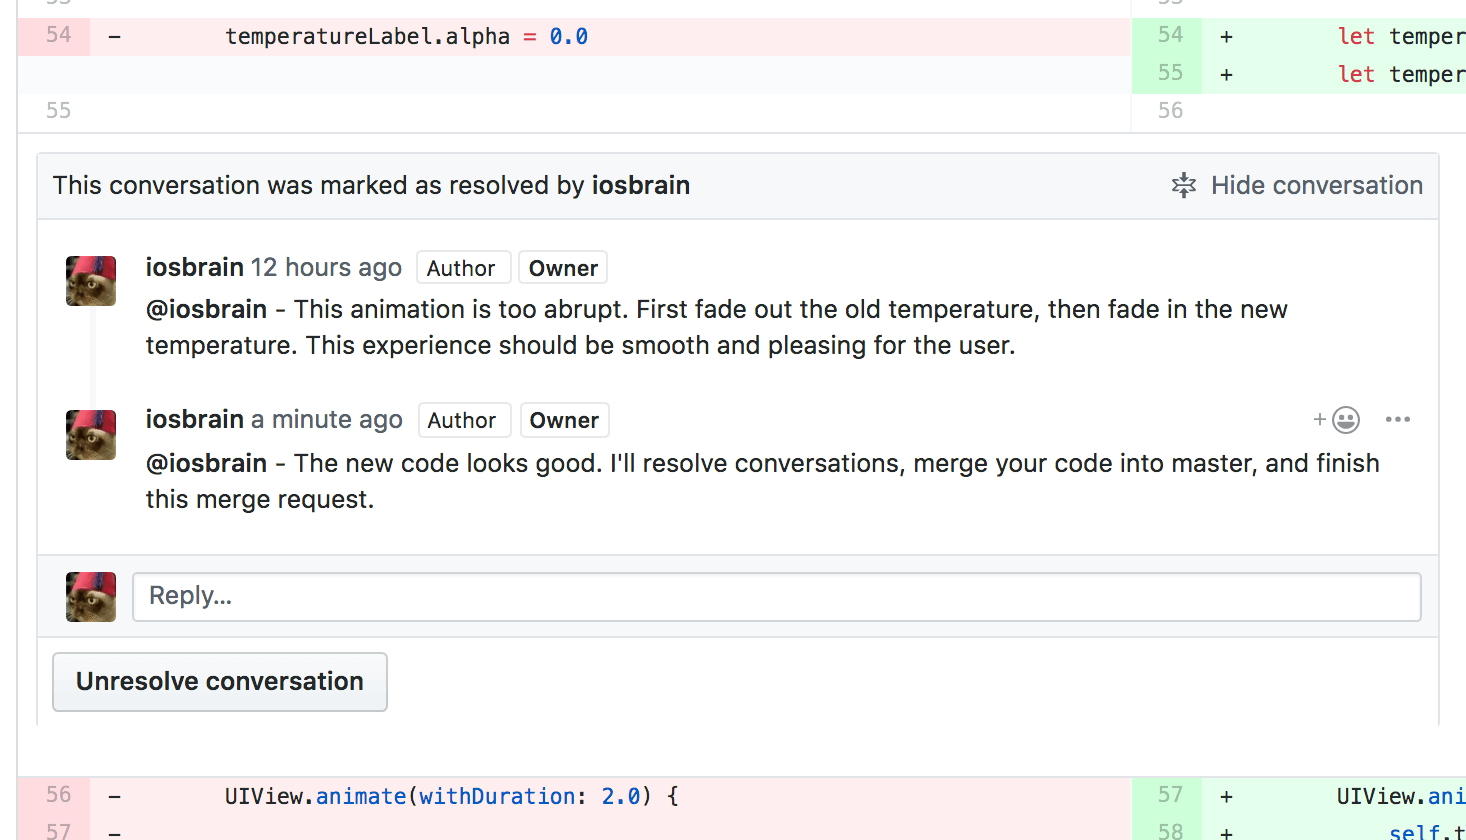
The first thing I want to do is type in a final comment and click the “Resolve conversation” button. Typing a comment is optional, but good practice. Note that in a larger pull request, there can be multiple conversations that I’d need to resolve. Here’s what team lead me did:
I now go to the “Conversation” tab and scroll down to what I showed you in the previous section: the image annotated with the #3. Let’s say the team is ready to move the code in this MR into production. So I click that big green “Merge pull request” button. If there were merge conflicts, of course team lead me would resolve them before merging, but this screen says:
This branch has no conflicts with the base branch
Merging can be performed automatically.
To confirm the merge, GitHub shows me this:

Finishing up
The master branch now contains the code that was requested to be written by team lead me with my directive to developer me to spice up our team’s temperature app with animation. It’s up to the team and/or project standard operating procedures as to whether to save or delete the feature branch (FEATURE-add-animation), including the remote and possibly many local copies. I usually keep feature or defect branches around for awhile, but clean them up eventually. The code contained in such branches can be useful. You’ll understand when you start using merge requests.
Now anyone who pulls master or creates a new feature or defect branch will be getting the latest code with the desired level of animation:
Conclusion
Before merge requests, Git flows across the software industry tended to vary widely. They still do vary, and variety is good, because there is no “perfect” flow that fits all projects and organizations.
But by creating a formal flow by which, for example, developers can pick Scrum-based stories or defect reports and start working on them and tracking them each with a specific merge request, we’ve come a long way in reining in the chaos that more informal Git flows can engender.
If you’re working on a mid- to large-sized project that has no formal Git flow, I would suggest you look at merge requests.
Suggested reading
Here are some great articles you can read to help you get up to speed on merge requests:
https://docs.gitlab.com/ee/user/project/merge_requests/
https://www.atlassian.com/git/tutorials/making-a-pull-request
https://help.github.com/en/articles/about-pull-requests
https://help.github.com/en/articles/creating-a-pull-request
https://help.github.com/en/articles/viewing-deployment-activity-for-your-repository
https://help.github.com/en/articles/merging-a-pull-request
https://help.github.com/en/articles/about-required-status-checks
https://help.github.com/en/articles/closing-issues-using-keywords
https://help.github.com/en/articles/requesting-a-pull-request-review
https://help.github.com/en/articles/about-pull-request-reviews

Avid and well-published author and software developer now specializing in iOS mobile app development in Objective-C and Swift. He has a strong background in C#, C++, .NET, JavaScript, HTML, CSS, jQuery, SQL Server, Agile, TDD, Git, and other technologies. He earned a B.Sc. and M.Sc. in Computer Science. Andrew has published several apps in the Apple App Store and has 30 years of experience in software development and professional writing. You can read his blog at https://iosbrain.com/.